Гаси волну Выбираем и настраиваем аппаратный деаутентификатор Wi-Fi на ESP8266
Содержание:
WiFiJammer Usage
Simple
python wifijammer.py
This will find the most powerful wireless interface and turn on monitor mode. If a monitor mode interface is already up it will use the first one it finds instead. It will then start sequentially hopping channels 1 per second from channel 1 to 11 identifying all access points and clients connected to those access points. On the first pass through all the wireless channels it is only identifying targets. After that the 1sec per channel time limit is eliminated and channels are hopped as soon as the deauth packets finish sending. Note that it will still add clients and APs as it finds them after the first pass through.
Upon hopping to a new channel it will identify targets that are on that channel and send 1 deauth packet to the client from the AP, 1 deauth to the AP from the client, and 1 deauth to the AP destined for the broadcast address to deauth all clients connected to the AP. Many APs ignore deauths to broadcast addresses.
python wifijammer.py -a 00:0E:DA:DE:24:8E -c 2
Deauthenticate all devices with which 00:0E:DA:DE:24:8E communicates and skips channel hopping by setting the channel to the target AP’s channel (2 in this case). This would mainly be an access point’s MAC so all clients associated with that AP would be deauthenticated, but you can also put a client MAC here to target that one client and any other devices that communicate with it.
Advanced
python wifijammer.py -c 1 -p 5 -t .00001 -s DL:3D:8D:JJ:39:52 -d --world
- -c – Set the monitor mode interface to only listen and deauth clients or APs on channel 1
- -p – Send 5 packets to the client from the AP and 5 packets to the AP from the client along with 5 packets to the broadcast address of the AP
- -t – Set a time interval of .00001 seconds between sending each deauth (try this if you get a scapy error like ‘no buffer space’)
- -s – Do not deauth the MAC DL:3D:8D:JJ:39:52. Ignoring a certain MAC address is handy in case you want to tempt people to join your access point in cases of wanting to use LANs.py or a Pineapple on them.
- -d – Do not send deauths to access points’ broadcast address; this will speed up the deauths to the clients that are found
- –world – Set the max channel to 13. In N. America the max channel standard is 11, but the rest of the world uses 13 channels so use this option if you’re not in N. America
Walking/driving around
python wifijammer.py -m 10
The -m option sets a max number of client/AP combos that the script will attempt to deauth. When the max number is reached, it clears and repopulates its list based on what traffic it sniffs in the area. This allows you to constantly update the deauth list with client/AP combos who have the strongest signal in case you were not stationary. If you want to set a max and not have the deauth list clear itself when the max is hit, just add the -n option like: -m 10 -n
All options:
python wifijammer.py
Step-by-Step process to Build a Wifi Jammer using Arduino Esp8266
Hardware used in this project.
- ESP8266 (Buy Now)
- Powerbank (Optional)


Step1:-
In this project, we will try to make IoT more secure by WiFi interference. In short, this experiment scans the available WiFi and WiFi networks, and we are able to select a specific network and use different attacks.
In order to make this WiFi jammer, you mainly need only part of it: ESP8266.
You can purchase a specific version of the ESP8266 with the NodeMCU firmware, and it is easy to program without any programmer. The ESP8266 has a built-in programmer. You can buy here
Step 2:- Set software and compile the firmware
- Download the Arduino compiler from the official website of Arduino from here.
- Install the software and execute it,
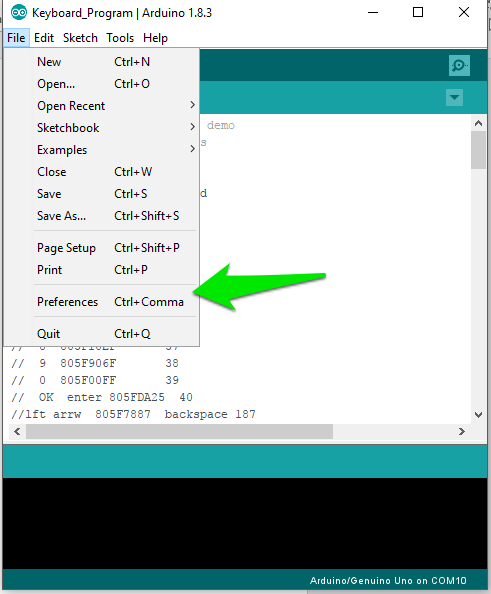
- Go to File -> Preferences
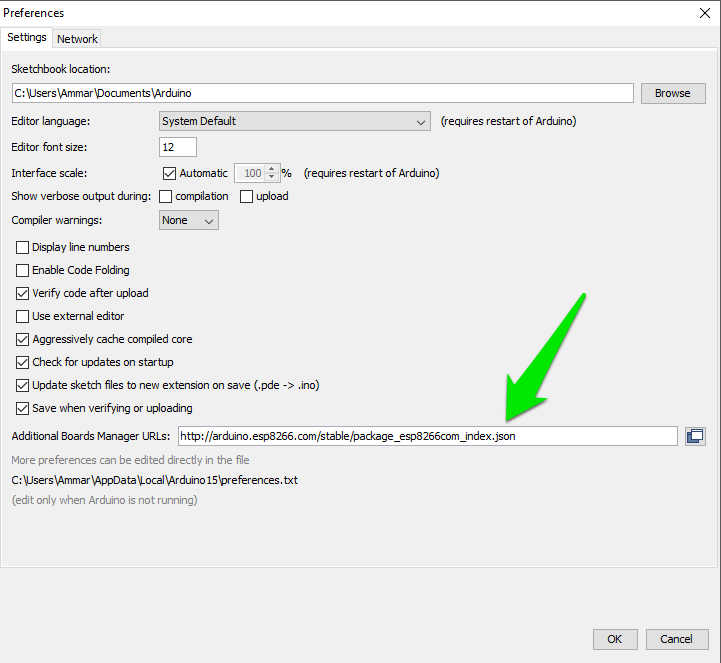
 4.Add http://arduino.esp8266.com/stable/package_esp8266com_index.json to the Additional Boards Manager URLs.
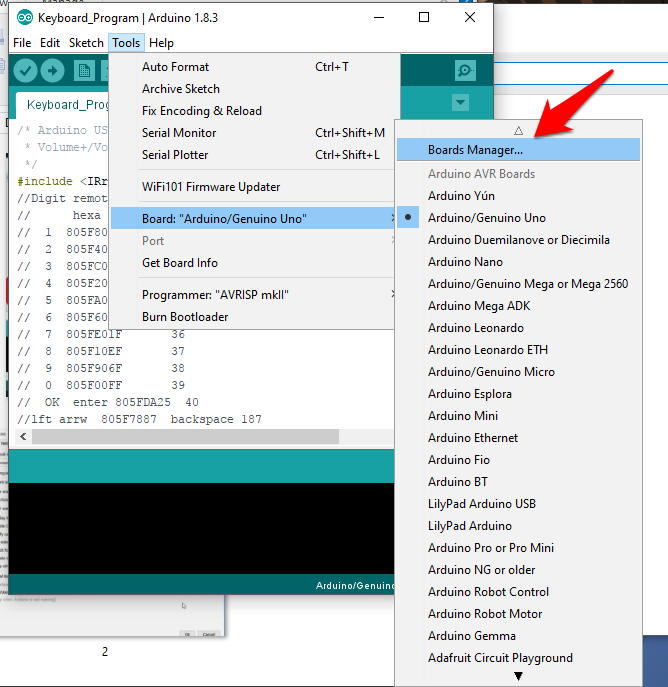
 5. Click to Tools -> Boards Manager
- Type keyword ‘esp8266’
- Select 2.0.0 and click on Install (must be version 2.0.0 never go for latest).

- Click File -> Preferences
- Open the folder path under More; preferences can be edited directly in the file. Don’t forget to save!
- Click on packages -> esp8266 -> hardware > esp8266 -> 2.0.0 -> tools -> sdk -> include
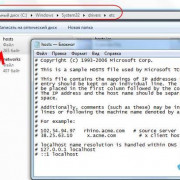
- Open user_interface.h file with your favourite text editor or just Wordpad.
- Scroll down and, before #endif, add following lines:typedef void (*freedom_outside_cb_t)(uint8 status);int wifi_register_send_pkt_freedom_cb(freedom_outside_cb_t cb);void wifi_unregister_send_pkt_freedom_cb(void);int wifi_send_pkt_freedom(uint8 *buf, int len, bool sys_seq);

Save the file!
Step 3 Get the Firmware files for ESP8266
- Just Download the files from GitHub link here (that firmware credit goes to Original Developer:spacehuhn)
- Click folder WIFI Jammer -> esp8266_deauth -> esp8266_deauther.ino in Arduino
- Click at your ESP8266 board at Tools > Board. I used NodeMCU 0.9 but you can try NodeMCU 1.0 or the generic ESP8266 module.

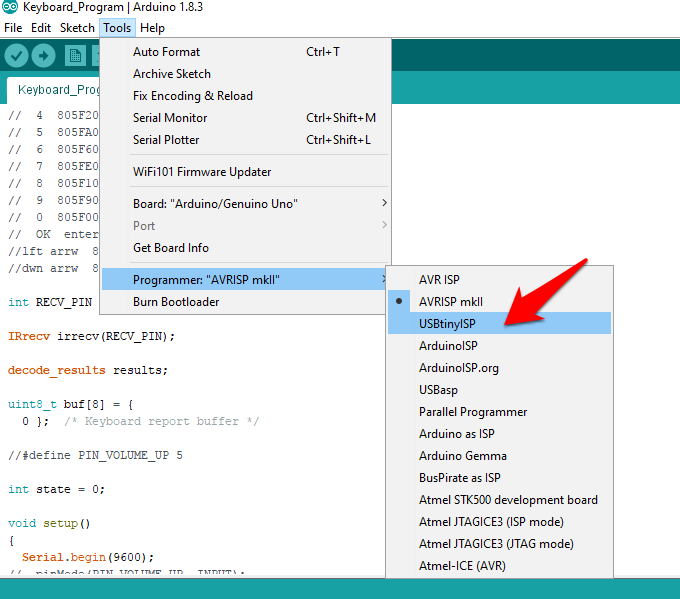
- Select your programmer at Tools > Programmer > ArduinoISP
 5. Select the right port number. at Tools > Port. If there aren’t any ports that show up, you may have to reinstall the drivers.
6.Upload! (Ctrl +U)
Your WIFI Jammer Device is Ready!
How To Use
1. First power your ESP8266. If you have a USB OTG cable or a mini USB cable with a power supply or USB wall adapter or a Power bank, you can use your smartphone.
2.Now you can use any smartphone or PC to control the interference by simply connecting to the ESP8266 module so that you can scan WiFi networks from mobile or PC or MAC and connect to AndroidAP. The password is ‘killwifi‘. You can change this SSID and password from the code you uploaded.
3.After Connection to the ESP8266 you can run the ip in your Browser 192.168.4.14.Just Hit the SCAN and Select the WIFI SSID
4.Select the attack tab, choose deauth all. Everyone on the WiFi should be disconnected. Now you can try other attacks as well. Happy hacking.
Note:-Please Do it at your Own Risk this is for Only Educational Purpose.
You may also to read these articles
Установка Deauther 2.0
Начнем с Deauther 2.0 — той самой прошивки, которую разработал Spacehuhn. В его репозитории на GitHub ты можешь выбрать версию для конкретной платы.
Файлы с расширением bin — это скомпилированные скетчи. Их нужно устанавливать на плату через специальный загрузчик. Но если захочешь, то в архивах с исходным кодом ты отыщешь библиотеки и скетчи, которые можно поставить через Arduino IDE.
Вариант 1. Присоединись к сообществу «Xakep.ru», чтобы читать все материалы на сайте
Членство в сообществе в течение указанного срока откроет тебе доступ ко ВСЕМ материалам «Хакера», увеличит личную накопительную скидку и позволит накапливать профессиональный рейтинг Xakep Score!
Подробнее
Вариант 2. Открой один материал
Заинтересовала статья, но нет возможности стать членом клуба «Xakep.ru»? Тогда этот вариант для тебя!
Обрати внимание: этот способ подходит только для статей, опубликованных более двух месяцев назад.
Я уже участник «Xakep.ru»