Как настроить удаленное включение компьютера. Включение Wake-On-LAN в Windows. Wake-on-Lan что этоУдалённое включение компьютера бесплатно, без SMS и без облаков, с помощью Mikrotik
Содержание:
- Comments and Discussions
- Что представляет собой Wake-ON-LAN
- Hardware requirements
- Setting up
- Настройка режима удалённого пробуждения компьютера в BIOS
- Running the software
- Требования технологии WOL
- Using the code
- Безопасность и Wake-ON-LAN
- Sending magic packet to wake up your mythbox
- Простейшая настройка удаленного доступа
- Настройка и включение Wake-On-Lan в Windows 10
- Other machine states and LAN wakeup signals
- Security considerations
- Программное обеспечение
- Удалённое включение компьютера бесплатно, без SMS и без облаков, с помощью Mikrotik
- Магический пакет Wake-On-Lan
Comments and Discussions
| You must Sign In to use this message board. | |||||||||||||||||||||||||||||||||||||||||||||||||||||||||||||||||||||||||||||||||||||||||||||||||||||||||||||||||||||||||||||
|
|
|||||||||||||||||||||||||||||||||||||||||||||||||||||||||||||||||||||||||||||||||||||||||||||||||||||||||||||||||||||||||||||
|
|||||||||||||||||||||||||||||||||||||||||||||||||||||||||||||||||||||||||||||||||||||||||||||||||||||||||||||||||||||||||||||
|
|||||||||||||||||||||||||||||||||||||||||||||||||||||||||||||||||||||||||||||||||||||||||||||||||||||||||||||||||||||||||||||
General News Suggestion Question Bug Answer Joke Praise Rant Admin
Use Ctrl+Left/Right to switch messages, Ctrl+Up/Down to switch threads, Ctrl+Shift+Left/Right to switch pages.
Article
Browse Code
View Stats
Revisions
Posted 28 Aug 2005
603.5K views
24.3K downloads
270 bookmarked
Что представляет собой Wake-ON-LAN
WOL, придуманная и введённая в функционал сетевых устройств достаточно давно, но не слишком изначально востребованная (только в узких кругах – сетевые бизнес-решения) Wake-On-LAN позволяет включать ПК дистанционно, посредством подачи специальной команды через локальную сеть, или даже через интернет. Сразу становится понятно, что это удобная функция – “разбудить” свою “машину” удаленно, чтобы получить доступ к своим файлам, операционной системе и установленному в ОС программному обеспечению.
Таким образом, используя связку Wake-On-Lan + (TeamViewer, Radmin, и прочие) – любой человек может контролировать свой ПК, работать в нём, настраивать его компоненты из любой точки мира, обращаясь к ПК через интернет. При этом никакой помощи, присутствия кого-либо еще непосредственно возле компьютера не требуется.
Так же, вкратце стоит отметить, что на базе WOL возможно реализовать Wake-on-Wireless LAN – это технология беспроводного включения компьютера, на основе работы WiFi роутеров и других подобных устройств. Конечно же, подобные устройства беспроводной передачи данных должны включать в свой программно-аппаратный функционал поддержку удалённого включения.
Hardware requirements
Wake-on-LAN support is implemented on the motherboard of a computer and the network interface (firmware), and is consequently not dependent on the operating system running on the hardware. Some operating systems can control Wake-on-LAN behaviour via NIC drivers. With older motherboards, if the network interface is a plug-in card rather than being integrated into the motherboard, the card may need to be connected to the motherboard by an additional cable. Motherboards with an embedded Ethernet controller which supports Wake-on-LAN do not need a cable. The power supply must meet ATX 2.01 specifications.
Hardware implementations
Older motherboards must have a WAKEUP-LINK header onboard connected to the network card via a special 3-pin cable; however, systems supporting the PCI 2.2 standard and with a PCI 2.2 compliant network adapter card do not usually require a Wake-on-LAN cable as the required standby power is relayed through the PCI bus.
PCI version 2.2 supports PME (Power Management Events). PCI cards send and receive PME signals via the PCI socket directly, without the need for a Wake-on-LAN cable.
Wake-on-LAN usually needs to be enabled in the Power Management section of a PC motherboard’s BIOS setup utility, although on some systems, such as Apple computers, it is enabled by default. On older systems the bios setting may be referred to as «WOL», on newer systems supporting PCI version 2.2, it may be referred to as «PME» (Power Management Events, which include WOL). It may also be necessary to configure the computer to reserve standby power for the network card when the system is shut down.
In addition, in order to get Wake-on-LAN to work, enabling this feature on the network interface card or on-board silicon is sometimes required. Details of how to do this depend upon the operating system and the device driver.
Laptops powered by the Intel Centrino Processor Technology or newer (with explicit BIOS support) allow waking up the machine using wireless Wake on Wireless LAN (WoWLAN).
In most modern PCs, ACPI is notified of the «waking up» and take control of the Power up. In ACPI, OSPM must record the «wake source» or the device that is causing the power-up. The device being the «Soft» power switch, the NIC (via Wake-on-LAN), the cover being opened, a temperature change, etc.
The 3-pin WOL interface on the motherboard consist of pin-1 +5V DC (red), pin-2 Ground (black), pin-3 Wake signal (green or yellow). By supplying the pin-3 wake signal with +5V DC the computer will be triggered to power up provided WOL is enabled in the BIOS configuration.
Setting up
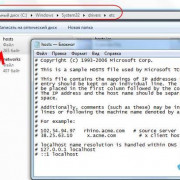
First, find out whether your network card supports wol:
# ethtool eth0
Settings for eth0:
       Supported ports:
       Supported link modes:   10baseT/Half 10baseT/Full
                               100baseT/Half 100baseT/Full
       Supports auto-negotiation: Yes
       Advertised link modes:  10baseT/Half 10baseT/Full
                               100baseT/Half 100baseT/Full
       Advertised auto-negotiation: Yes
       Speed: 100Mb/s
       Duplex: Full
       Port: MII
       PHYAD: 1
       Transceiver: internal
       Auto-negotiation: on
       Supports Wake-on: pumbg
       Wake-on: d
       Current message level: 0x00000001 (1)
       Link detected: yes
The ‘g’ in Supports Wake-on: pumbg indicates that wake-on-lan by using a ‘magic packet’ is indeed supported. Next, you need to make sure that wake-on-lan support is enabled in the BIOS (although, this does not seem to be necessary for my motherboard). In addition, you need to tell your network card to enable wake-on-lan:
# ethtool -s eth0 wol g
When you run `sudo ethtool eth0` again you will see that «Wake-on: d» (disable; wake on nothing) has changed to «g» (wake on magic packet)
Since after rebooting Wake-on will be reset, you will want to add this setting somewhere in your boot up.
Ubuntu 10.04/12.04
Before making manual additions, see: . If the program exists, WOL will be turned on automatically.
To make this setting permanent edit , in the section (or you might have an section) add at the end:
ethernet-wol g
Other Linux
To make this setting permanent edit /etc/rc.local:
# nano -w /etc/rc.local
Add above the ‘exit 0’ line.
Now turn off you mythbox and send it a ‘magic packet’.
Настройка режима удалённого пробуждения компьютера в BIOS
Для успешной работы компьютера в режиме Wake-On-Lan, помимо соблюдения технических требований поддерживаемых стандартов, и соответствующей настройки сетевой карты – необходимо также включить соответствующий режим работы в BIOS компьютера.
Перезагрузите (включите) компьютер, и с первых секунд начала загрузки непрерывно нажимайте клавишу “F2” или “DEL”, в зависимости от версии BIOS. Далее нам нужно найти соответствующую настройку BIOS, которая позволяет включить режим Wake-On-Lan. Как правило, данная опция находится в разделе BIOS “Конфигурация” (Configuration) или “Управление питанием” (Power management). Но в силу того, что на рынке персональных компьютеров версий BIOS достаточно большое количество, и между собой они сильно различаются в плане построения интерфейса, то однозначно написать, где находится опция включена WOL – затруднительная задача.
Даже само название технологии удалённого включения может называться по-разному, в зависимости от модели и версии BIOS, платформы ПК (MAC, Windows, Linux). Помимо исходного названия “Wake-On-Lan”, посмотрите примеры возможных альтернативных вариантов названий, из списка:
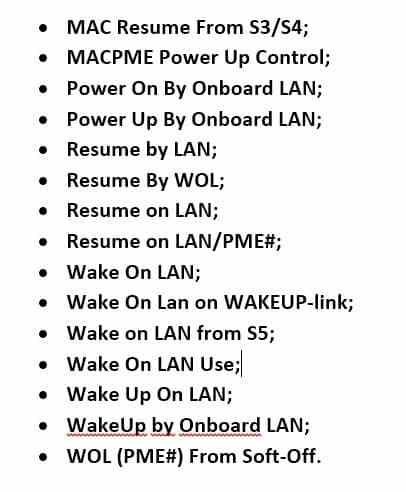
После того, как опция найдена, выберите вариант её режима работы как “Включено” или “Enabled”, если BIOS на английском языке. Всё, настройки BIOS на этом закончены. Для сохранения изменений нажмите клавишу “F10”, или в пункте меню BIOS найдите пункт “Сохранить и выйти”, подтвердите в открывшемся окне правильность выбора варианта выхода (с сохранением), нажав ОК. Компьютер уйдёт в перезагрузку с уже новым заданным параметром BIOS.
Running the software
Here are some steps to get up and running quickly.
|
|
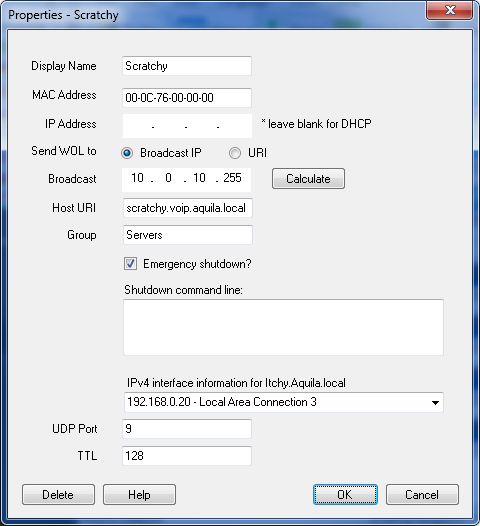
The main window should now display your new host and start
pinging it to see if it is available.
Right-click the host and you will see some options:
|
1
Next >
Требования технологии WOL
Чтобы реализовать такую схемы работы ПК, необходимо соблюдение следующих технических условий:
- В материнскую плату ПК (в которую, как правило, и интегрирована сетевая карта) должна быть встроена функция поддержки Wake-On-Lan. Успокоим Вас сразу – в современных материнских платах такая функция присутствует всегда, т.е. есть практически по умолчанию.
- Блок питания ПК должен поддерживать известный стандарт ATX. Этой технологии более 1,5 десятка лет, он популярен и используется и стандарт ATX поддерживается практически всеми блоками питания, имеющимся на рынке компьютерных комплектующих.
- Сам компьютер должен быть постоянно подключен к источнику питания – будь это электросеть, аккумулятор (если это ноутбук или другой вид портативного ПК), либо источник бесперебойного питания (ИБП).
В силу того, что работа технологии WOL реализована на аппаратном уровне компьютера, то данная технология работает в большинстве видов операционных систем, будь то Windows, Mac или Linux.
Удобство технологии Wake-On-Lan в том и заключается, что, когда компьютер не востребован Вами (а Вы удалены от компьютера) – ПК может находиться в любом из рабочих состояний, которые экономят электроэнергию. Будь то режим гибернации, спящий режим, да что там – ПК даже может быть выключен (но, естественно, не отсоединён физически от электропитания)! Ну а в случае, если Вам понадобятся какие-либо файлы на этом ПК, или же нужно будет запустить определенную программу на нём – Вы с лёгкостью можете “разбудить” свой компьютер, включить удалённо и начать работу с ним. И это, согласитесь, очень удобно, очень эффективно.
Итак, если технические условия соблюдены, стандарты и формат WOL поддерживаются – перейдем к разделу настроек Wake-On-Lan, чтобы реализовать данный функционал.
Using the code
(added upon update: I did not have the chance to test the new uploaded ‘PowerOn’ to see how it works with a password. It would be appreciated if anyone does can tell if his/her test was successful. Thank you.
I did not provide any C++ classes, because I didn’t want to hide such easy stuff from readers and write a class for one function!
There are two demos included in this article.
- Power On
- MAC Finder
In the PowerOn demo I tried to turn on a computer in our LAN network, using the mechanism I described above. The job is completed in two functions and . The second function’s job is to convert a hex string say «E9» to an integer value, 233 in our example. It uses the function to do the duty.
The does the following:
- Creates a UDP socket.
- Creates a magic packet.
- Broadcasts the packet.
    CAsyncSocket s;

    BYTE magicP;

...


    for (int i=;i//

    for (i=;i//

        magicP = HexStrToInt(macAddr.Mid(i*2,2));
    }


    for (i=;i6],&magicP,6);

...

    s.SendTo(magicP,102,atol(m_port));
MAC Finder
At first I thought I couldn’t add the following project, but thought more and decided to do it because you might want to find a MAC automatically, and probably give the found address to your peer (TCP socket) application in a LAN, and use it later! Whatever you want to do, this might be helpful.
I used Mr. Khalid Shaikh’s code, but his code was not ‘compileable’ in my VC++ 6.0, so I found the appropriate DLL where the function had been located and used MSDN to reproduce the needed structures (hope this is not a copyright problem) and then used a pointer to the function and to get the function. It seems that the function is added as a resource to the DLL (it’s not documented) so we can’t use . I tested the result on MS Windows 98, Me, 2K, XP(SP1). It worked fine! All the processes is done in a function named . This function is called in of MAC Finder.
Безопасность и Wake-ON-LAN
Суть работы технологии WOL такова, что каждый из пользователей той локальной (глобальной) сети, в которой находится и сам компьютер с включенным WOL, может осуществить запуск этого компьютера, зная MAC-адрес сетевой карты ПК. Соответственно, вопрос безопасности данных остаётся открытым.
Проблема актуальна лишь для компьютеров с включенной технология пробуждения, которые подключены к какой-либо общественной сети. Для компьютеров домашней сети – уровень безопасности находится на высоком уровне.
С другой стороны, даже осуществив включение удалённого ПК путём посылки ему “волшебного” пакета – злоумышленник не сможет обойти настройки безопасности ПК. Пароль на вход в учётную запись, пароль при старте BIOS (если установлена эта опция), персональные настройки безопасности брандмауэра внутри Windows и прочие моменты, связанные с безопасностью – злоумышленнику придётся как-то обходить, ведь технология Wake-ON-Lan позволяет как раз лишь включить компьютер удалённо, но никак не даёт прямого доступа к информации на компьютере.
Бывали случаи, когда хакеры, используя связку серверных технологий, таких как PXE и DHCP, всё-таки получали доступ к операционной системе Windows на удалённом ПК, используя для обхода защиты установочный образ Windows, специальным образом настроенным “под себя”, под свои корыстные цели. Но это удел узкого круга IT-специалистов с высоким уровнем знаний, которые вряд ли позарятся на обычный домашний ПК рядового пользователя.
Sending magic packet to wake up your mythbox
You will need a wake-on-lan client to send ‘magic packets’ over your network. First, determine the MAC address of the machine you want to power on:
# ifconfig
$ wol 00:4F:49:07:0B:5F
Via Python one-liner
Maybe not as clean, but works on all systems where Python is available, replace the ‘\x00\x1A\x92\x9D\x69\x85’ with the numbers of your backend’s MAC address:
# python -c "import socket; s=socket.socket(socket.AF_INET, socket.SOCK_DGRAM); s.setsockopt(socket.SOL_SOCKET, socket.SO_BROADCAST, 1);
s.sendto('\xff'*6+'\x00\x1A\x92\x9D\x69\x85'*16, ('', 7));"
Send automatically from a frontend
By adding one or two scripts into a remote frontend, it will automatically start the backend, and then wait until the backend is ready to accept a client connection. Ideally the frontend and backend would boot concurrently, however that’s difficult to arrange without building a special environment (e.g. to boot rapidly from flash memory), so the practical solution is simply to use an /etc/init.d script in the frontend, and wait while the frontend and backend boot serially.
The purpose of the first script is to issue the WOL packet as early as possible. If the overall bootup time is not considered to be an issue, this script can be omitted and the wakeonlan command can be issued from the script which runs from the user’s auto-started sessions (called mythfestart.sh, further down). These scripts use ‘wakeonlan’ from Ubuntu package repos, but wol or ether-wake would work just as well.
/etc/init.d/wol:
#! /bin/sh
# MAC address of backend
SERVER_MAC=xx:xx:xx:xx:xx:xx
#
case "$1" in
  start)
    # Issue wakeonlan at intervals until our own network interface
    #  is active and the magic packet is successfully sent.
    #
    until /usr/bin/wakeonlan $SERVER_MAC > /dev/null 2>&1 ; do
      sleep 1
    done
  ;;
  *)
esac
exit 0
After the above script has been placed in /etc/init.d/ (and marked executable with chmod +x ..), it can be made to run at bootup by issuing:
sudo update-rc.d wol defaults
Now we need a script which waits until the backend is ready to accept client connections, before starting mythfrontend. That way, the frontend will start cleanly without any error panels such as «no UPnP backends found», etc. This script can be added to the user’s autostarted sessions (in place of the normal ‘mythfrontend’ script).
/usr/bin/mythfestart.sh:
#! /bin/bash
# IP address of backend
SERVER_IP=xxx.xxx.xxx.xxx
# SERVER_MAC=xx:xx:xx:xx:xx:xx
# Could optionally send a wakeup packet here, if
#  a) it is decided that the early-running script above is not needed, or
#  b) to cover the rare case that backend was shutting down when first one sent
#
# Use mythTV status port as backend connectivity test
until ; do
  sleep 3
done
# start frontend
mythfrontend &
exit 0
Both scripts must of course be made executable with chmod +x
Простейшая настройка удаленного доступа
Для начала кратко остановимся на том, как в Windows включить удаленный доступ к компьютеру в смысле использования именно установленных на нем программ и оборудования, которое используется для обработки информации.
Для этого в свойствах системы необходимо перейти к разделу дополнительных параметров, а затем на вкладке доступа активировать разрешение сетевой идентификации и в дополнительных опциях включить разрешение на управление терминалом. После этого в основной информации нужно будет запомнить полное название компьютера и имя пользователя, если их зарегистрировано несколько.
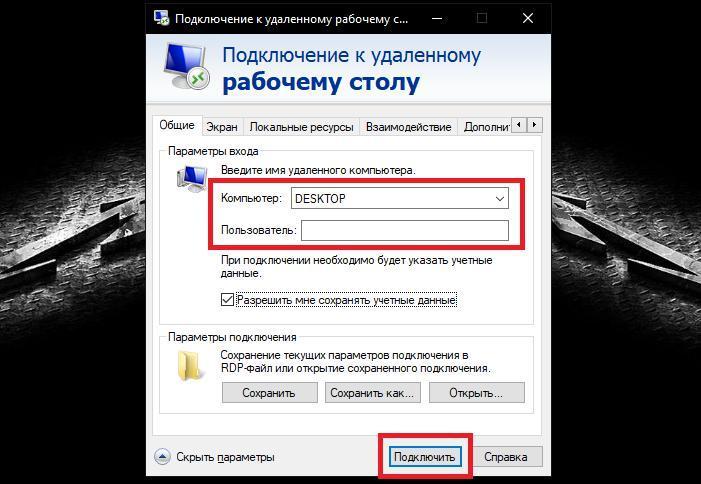
После этого на устройстве, с которого будет производиться подключение, нужно вызвать соответствующий апплет подключения к удаленному «Рабочему столу», ввести вышеуказанные данные и активировать соединение.

Примечание: обратите внимание на то, что на удаленном ПКМ или ноутбуке, в случае отсутствия пользовательского пароля для входа в систему, его нужно будет создать в разделе управления учетными записями. Если у пользователя есть регистрация Microsoft, то с равным успехом можно воспользоваться и ею, что выглядит значительно проще
Настройка и включение Wake-On-Lan в Windows 10
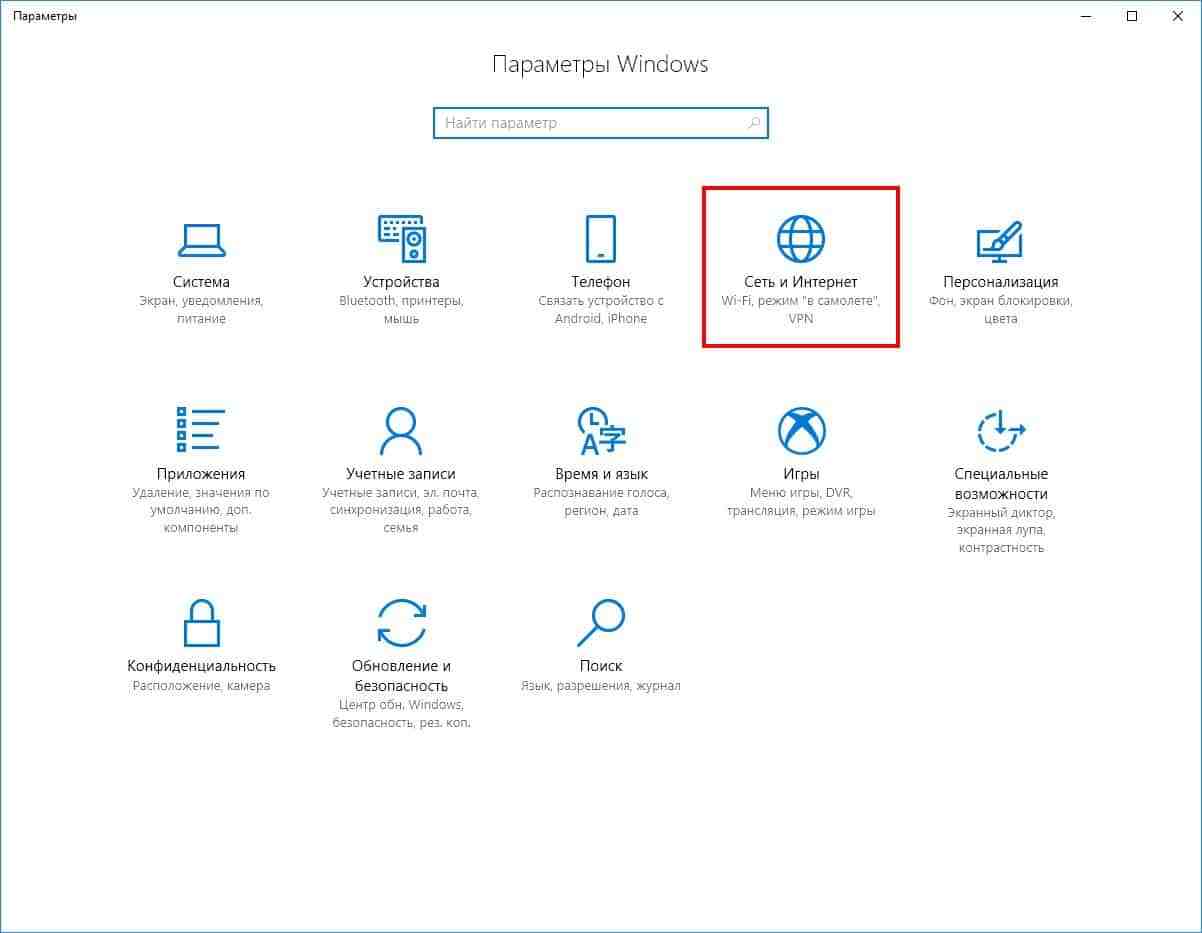
Находясь непосредственно в Windows 10, нажимаем комбинацию кнопок клавиатуры “WIN” + “I”, откроется окно “Параметры”, в нём выберите раздел “Сеть и Интернет”:
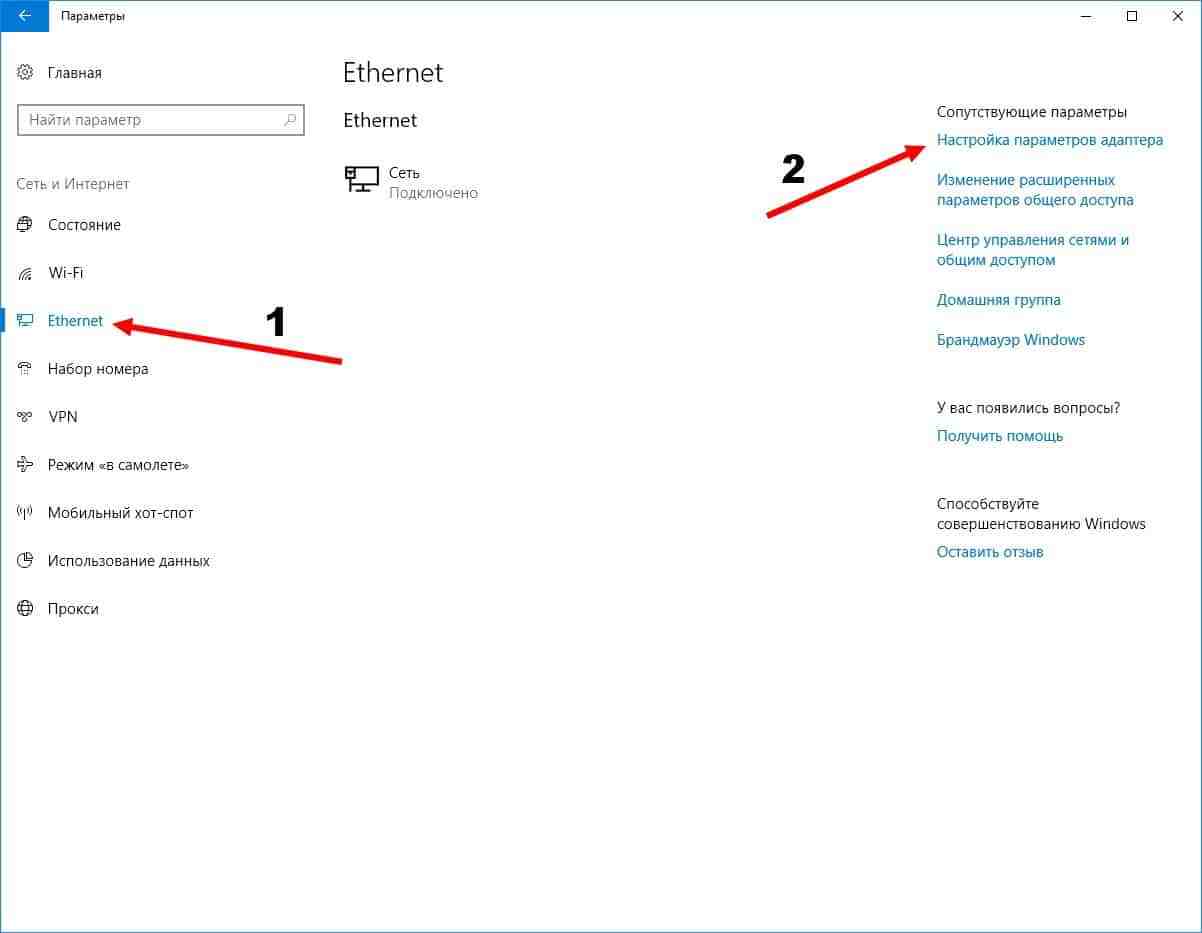
В появившемся окне кликните мышью в его правой части по разделу “Ehernet” (сетевой адаптер), и затем в левой части окна нажмите мышью на пункт “Настройка параметров адаптера”:
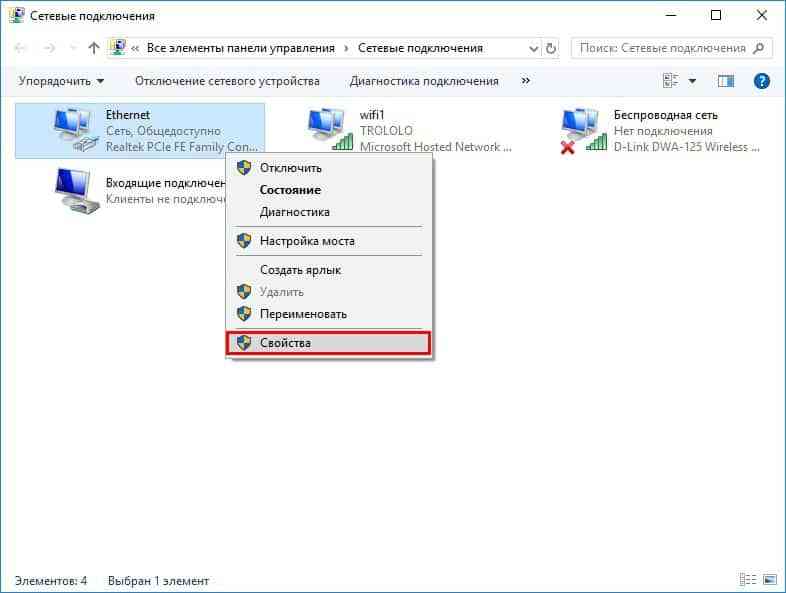
Откроется окно “Сетевые подключения”. Найдите ярлык с названием “Ethernet”, нажмите на нём правой кнопкой мыши, и выберите во всплывшем меню пункт “Свойства”:
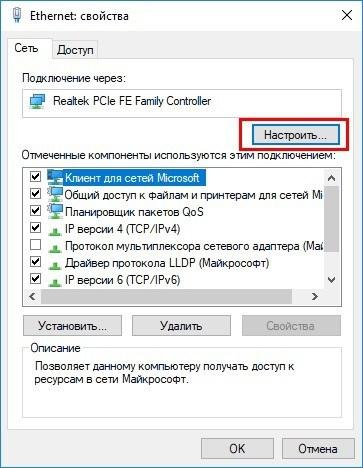
Откроются настройки сетевой карты ПК. Вверху справа, сразу под названием сетевой карты нажмите на кнопку “Настроить”.
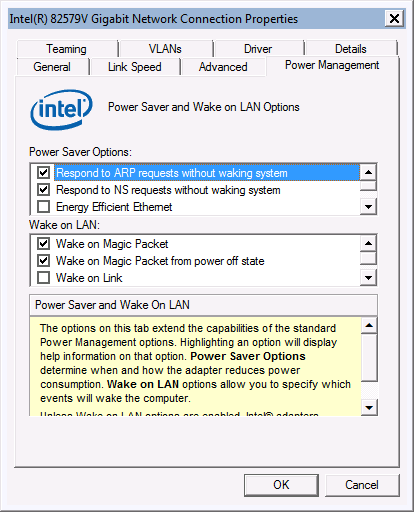
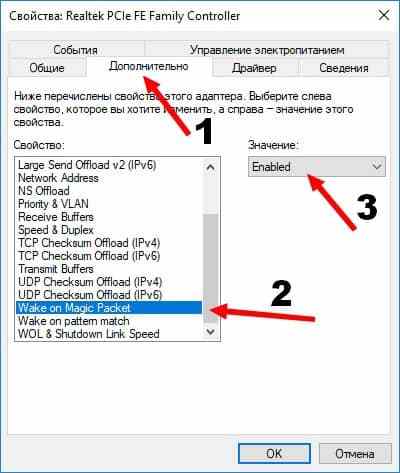
В открывшемся окне выберите мышью вкладку “Дополнительно”. Далее, в появившемся окне настроек свойств сетевой карты – пролистайте список параметров до пункта “Wake on Magic Packet”, выделите его кликом мыши, и в правой части окна переключите параметр в состоянии “Enabled” – “включено”, если состояние будет “Disabled” – “выключено”:
Далее, не нажимая кнопку “Ок”, и не закрывая текущего окна – выберите закладку “Управление электропитанием”. В данном окне проверьте наличие галочек на пунктах (включите их):
Выполнив все эти действия, нажмите кнопку “Ок”, окно настроек закроется, новые параметры вступили с этого момента в силу. Закройте и все остальные окна, открытые для совершения данных настроек WOL.
Other machine states and LAN wakeup signals
In the early days of Wake-on-LAN the situation was relatively simple: a machine was connected to power but switched off, and it was arranged that a special packet be sent to switch the machine on.
Since then many options have been added and standards agreed upon. A machine can be in 7 from S0 (fully on) through S5 (powered down but plugged in) and disconnected from power (G3, Mechanical Off), with names such as «sleep», «standby», and «hibernate». In some reduced-power modes the system state is stored in RAM and the machine can wake up very quickly; in others the state is saved to disk and the motherboard powered down, taking at least several seconds to wake up. The machine can be awakened from a reduced-power state by a variety of signals.
The machine’s BIOS must be set to allow Wake-on-LAN. To allow wakeup from powered-down state S5, wakeup on PME (Power Management Event) is also required. The Intel adapter allows «Wake on Directed Packet», «Wake on Magic Packet», «Wake on Magic Packet from power off state», and «Wake on Link». Wake on Directed Packet is particularly useful as the machine will automatically come out of standby or hibernation when it is referenced, without the user or application needing to explicitly send a magic packet. Unfortunately in many networks waking on directed packet (any packet with the adapter’s MAC address or IP address) or on link is likely to cause wakeup immediately after going to a low-power state. Details for any particular motherboard and network adapter are to be found in the relevant manuals; there is no general method. Knowledge of signals on the network may also be needed to prevent spurious wakening.
Unattended operation
For a machine which is normally unattended, precautions need to be taken to make the Wake-on-LAN function as reliable as possible. For a machine procured to work in this way, Wake-on-LAN functionality is an important part of the purchase procedure.
Some machines do not support Wake-on-LAN after they have been disconnected from power (e.g., when power is restored after a power failure). Use of an uninterruptible power supply (UPS) will give protection against a short period without power, although the battery will discharge during a prolonged power cut.
Waking up without operator presence
If a machine that is not designed to support Wake-on-LAN is left powered down after power failure, it may be possible to set the BIOS to start it up automatically on restoration of power, so that it is never left in an unresponsive state. A typical BIOS setting is AC back function which may be on, off, or memory. On is the correct setting in this case; memory, which restores the machine to the state it was in when power was lost, may leave a machine which was hibernating in an unwakeable state.
Other problems can affect the ability to start or control the machine remotely: hardware failure of the machine or network, failure of the BIOS settings battery (the machine will halt when started before the network connection is made, displaying an error message and requiring a keypress), loss of control of the machine due to software problems (machine hang, termination of remote control or networking software, etc.), and virus infection or hard disk corruption. Therefore, the use of a reliable server-class machine with RAID drives, redundant power supplies, etc., will help to maximize availability. Additionally, a device which can switch the machine off and on again, controlled perhaps by a remote signal, can force a reboot which will clear problems due to misbehaving software.
For a machine not in constant use, energy can be conserved by putting the machine into low-power RAM standby after a short timeout period. If a connection delay of a minute or two is acceptable, the machine can timeout into hibernation, powered off with its state saved to disk.
Security considerations
Magic packets are sent via the data link or OSI-2 layer, which can be used or abused by anyone on the same LAN, unless the L2 LAN equipment is capable of (and configured for) filtering such traffic to match site-wide security requirements.
Firewalls may be used to prevent clients among the public WAN from accessing the broadcast addresses of inside LAN segments, or routers may be configured to ignore subnet-directed broadcasts (see above.)
Certain NICs support a security feature called «SecureOn». It allows users to store within the NIC a hexadecimal password of 6 bytes. Clients have to append this password to the magic packet. The NIC wakes the system only if the MAC address and password are correct. This security measure significantly decreases the risk of successful brute force attacks, by increasing the search space by 48 bits (6 bytes), up to 296 combinations if the MAC address is entirely unknown. However any network eavesdropping will expose the cleartext password. Still, only a few NIC and router manufacturers support such security features.[citation needed]
Abuse of the Wake-on-LAN feature only allows computers to be switched on; it does not in itself bypass password and other forms of security, and is unable to power off the machine once on. However, many client computers attempt booting from a PXE server when powered up by WoL. So, a combination of DHCP and PXE servers on the network can sometimes be used to start a computer with an attacker’s boot image, bypassing any security of the installed operating system and granting access to unprotected, local disks over the network.
Interactions with network access control
The use of Wake-on-LAN technology on enterprise networks can sometimes conflict with network access control solutions such as 802.1x or MAC-based authentication, which may prevent magic packet delivery if a machine’s WoL hardware has not been designed to maintain a live authentication session while in a sleep state. Configuration of these two features in tandem often requires tuning of timing parameters and thorough testing.
Data privacy
Some PCs include technology built into the chipset to improve security for Wake-on-LAN. For example, Intel AMT (a component of Intel vPro technology), includes Transport Layer Security (TLS), an industry-standard protocol that strengthens encryption.
AMT uses TLS encryption to secure an out-of-band communication tunnel to an AMT-based PC for remote management commands such as Wake-on-LAN. AMT secures the communication tunnel with Advanced Encryption Standard (AES) 128-bit encryption and RSA keys with modulus lengths of 2,048 bits. Because the encrypted communication is out-of-band, the PC’s hardware and firmware receive the magic packet before network traffic reaches the software stack for the operating system (OS). Since the encrypted communication occurs «below» the OS level, it is less vulnerable to attacks by viruses, worms, and other threats that typically target the OS level.
IT shops using Wake-on-LAN through the Intel AMT implementation can wake an AMT PC over network environments that require TLS-based security, such as IEEE 802.1x, Cisco Self Defending Network (SDN), and Microsoft Network Access Protection (NAP) environments. The Intel implementation also works for wireless networks.
Программное обеспечение
Чтобы упростить себе задачу, включить компьютер удаленно можно при помощи специальных утилит. Многие рекомендуют использовать клиент TeamViewer, но он для рядового пользователя может показаться слишком сложным в настройке.
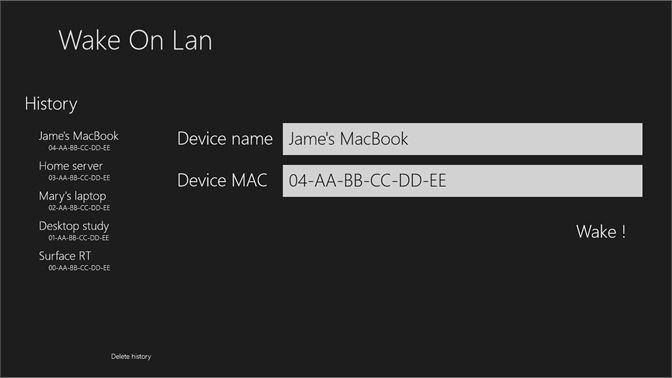
Куда проще воспользоваться небольшой программой в которой нужно ввести MAC-удаленного терминала и указать полное название подключаемого компьютера, а затем просто нажать кнопку пробуждения. Зато TeamWiewer можно использовать и как средство включения удаленного ПК, и как клиент подключения к удаленному «Рабочему столу».
27 октября 2016 в 23:58
Удалённое включение компьютера бесплатно, без SMS и без облаков, с помощью Mikrotik
Системное администрирование
Tutorial
… а также без проброса портов, SSH/telnet и установки сторонних приложений. С любого компьютера, подключённого к интернет и даже с телефона!
Периодически мне бывает нужно включить домашний компьютер, когда я нахожусь не дома. Обычно я не запаривался и звонил или отправлял сообщение с такой просьбой жене, которая сидит дома в декрете. Очень удобное средство удалённого управления с голосовым интерфейсом. Однако у этого способа есть ряд недостатков — ушла гулять, укладывает ребёнка, или ещё чем либо занята. Хотелось простого решения из того что есть под рукой.
Первым делом включаем Wake on LAN в BIOS»е материнской платы, у всех это делается по-своему, у многих включено по умолчанию. На одном из моих ПК даже такой опции нету — всегда включено.
Далее переходим в WinBox и подключаемся к вашему роутеру (если хотите, можете через SSH или через HTTP(S), я всё делаю в WinBox»е). Если открыть текстовую консоль RouterOS и пошарить там в разделе /tool (или в wiki-мануалах), то можно обнаружить утилиту wol со следующим синтаксисом:
/tool wol mac=XX:XX:XX:XX:XX:XX interface=ifname
Где ifname — имя интерфейса, с которого будет рассылаться волшебный пакет, XX:XX:XX:XX:XX:XX — mac адрес вашего компьютера.
Вроде всё просто, но Winbox с телефона не особо запускается и mac адрес по памяти замучаешься вводить. Можно запускать SSH и отправлять в него одну единственную команду, но это тоже долго и нудно. Используем фаервол!
Напрямую из правил фильтра запускать исполнение команд нельзя, из всех действий нам больше всех подойдёт добавление адреса в address-list, т.к. оно позволяет создать новый объект в операционной системе роутера, доступный из скриптов.
Добавим новое правило для цепочки input и расположим его среди других разрешающих правил этой цепочки. Укажем протокол tcp и dst-port — любой из верхних портов.
Действие выберем add src (можно и dst) to address list, укажем имя листа.
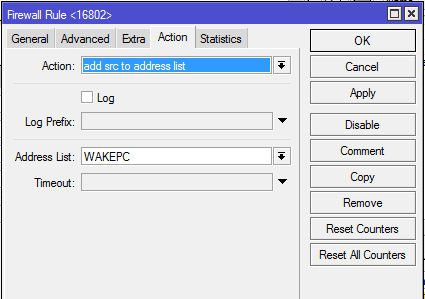
В поле on event напишем простенький скрипт:
:local WAKEPC
:if ($WAKEPC!=»») do={
/tool wol mac=00:11:22:33:44:55 interface=bridge_lan
/ip firewall address-list remove
}
Не забываем указать правильный mac, имя интерфейса и адрес-листа. Данный скрипт при обнаружении элементов в адрес-листе выполнит команду, отправляющую магические пакеты на ваш компьютер, после чего удалит запись из адрес-листа.
Для включения вашего компьютера достаточно открыть браузер и перейти на IP вашего микротика, указав порт, который мы задали в правиле фаервола: http://your.router.net:port , после чего фаервол создаёт запись в адрес-листе, задание планировщика обнаружит эту запись, выполнит запуск утилиты wol, и удалит запись из адрес-листа. Проще паренной репы, можем добавить адрес в избранное, чтобы каждый раз не вводить.
Только не забывайте про безопасность, данный способ ничем не защищён и кто угодно может включить Ваш компьютер, зная или подобрав нужный порт. Для защиты можно использовать VPN, port knocking, whitelist или метод Неуловимого Джо — решать Вам. Если Вам требуется включать таким образом по-отдельности несколько компьютеров, создайте соответствующее количество правил на разных портах, каждое из которых будет кидать адреса в свой адрес-лист, скрипт в задании планировщика также размножаем через Ctrl+C, Ctrl+V, либо создаём отдельные задания для каждого — как хотите.
Магический пакет Wake-On-Lan
Как Вы заметили, в предыдущем разделе упоминался такой термин, как “магический” пакет, его ещё называют “волшебный” пакет. О чем идёт речь в данном случае, о какой магии, если суть тематики сугубо техническая – настройка ПК?
Дело в том, что “магическим” пакетом была названа та самая команда, передаваемая по сети, которая заставляет компьютер “проснуться”, включиться по “приказу” владельца.
Как выглядит “магический” пакет? Всё достаточно просто – это незамысловатая комбинация чисел, эдакий числовой блок, который отправляется по сети от устройства пользователя к его удаленному компьютеру, находящемуся в режиме сна. Данный блок состоит из следующих частей:
- шестнадцатеричный код “0xFF”, повторённый 6 раз подряд;
- MAC-адрес сетевой карты компьютера, повторённый 16 раз.
В силу того, что MAC-адрес любого сетевого устройства в мире – уникален, и не повторяется, то “магический” пакет, содержащий этот MAC-адрес, может предназначаться вполне конкретному, одному, сетевому устройству. Что и позволяет удалённо, находясь в любой точке планеты, и имея доступ в сеть Интернет – адресно обратиться именно к своему устройству. Все другие ПК, роутеры и прочие сетевые устройства – соответственно, никак не среагируют на появление такого пакета данных, т.к. у них уже свои, также абсолютно уникальные, MAC-адреса.
Сетевой адаптер, благодаря включенной технологии Wake-On-Lan, постоянно сканирует сеть на появление как раз этой команды, чтобы инициировать в то же мгновение процесс включения персонального компьютера – будет подано питание, ПК включится, инициируется запуск операционной системы Windows.
Для всего этого нужно перевести сетевую карту в режим управления питанием ПК, то есть разрешающий ей включать компьютер при появлении сигнала – “магического” пакета, что мы и сделали в предыдущем разделе.