Tplinkwifi.net setup and configuration process
Содержание:
- How to connect your TP-Link Kasa account to your Amazon Alexa account
- Вход в настройки роутера — http192.168.0.1
- TP-Link router setup via tplinkwifi.net
- Что есть 192.168.0.1 и с чем его едят
- Updating Firmware for TP-Link WiFi Router using http tplinklogin.net Login Address
- TP-Linkwifi.net
- TP-link router setup and installation guide
- Factory Default Login Default for Majority TP-Link WiFi Router
- TP-link router password changereset
- Не заходит на 192.168.0.1. Что делать
How to connect your TP-Link Kasa account to your Amazon Alexa account
Before we start:
Ensure that you have set up Kasa and created your TP-Link Kasa account.
Set up of Kasa is quite easy. You just have to open the Kasa app and create your free account. Followed by adding your smart home products as you install them. Each smart home product can be given a unique name to make it easier for you and for Alexa to mark a difference amongst them. Once you have added your smart home products‚ it is easier to control them individually or in groups through Kasa and also enabling voice control with Amazon Alexa which takes only few extra taps.
You also need to ensure that Remote Control is enabled on your Kasa APP.
For this, you will have to open the Kasa App and sign into your account. Connect all your smart home devices to home network and ensure all your devices are working through Remote Control.
Steps to follow to Connect Kasa device to Amazon Alexa:
- Open the Amazon Alexa App on your device and go to tap on the «Home» icon located on the bottom right corner. Click on the «+» icon that is on the upper right corner and select «Add Device».
- Under Add device, Select «Kasa Smart» and then, tap on «Continue» to proceed.
- Click on «ENABLE TO USE» and TP link Kasa sign in page displays where you have to type in your Kasa account email and password and then click «Authorize».
- After you have authorized successfully, the Kasa App will show a reminder to let you know that «TP-LINK Kasa has been successfully linked».
- Tap «Done» to proceed further.
- «DISCOVER DEVICES» screen appears, you need to select Discover Devices or you can even use voice command «Alexa, discover devices». Alexa will then scan and display you the number of devices bound to your Kasa account.
- Hence, you have now completed the setup process and you can select the device types now and view which devices are discovered by Alexa.
All the discovered Kasa smart devices can hence be controlled through your Alexa device. You are then requested to test if Alexa works normally with voice commands.
- Type “Kasa” in the search bar and enter, tap on “TP-LINK Kasa”.
- Tap “ENABLE” which requires account to be linked, therefore, enter your Kasa Account login details and tap “Authorize”.
- Tap “X” on the top to close the window to discover the devices which you can now control with Alexa.
- Tap “DISCOVER DEVICES” so that they can be used with Alexa or you can instead use voice command “Alexa, discover devices” or tap “Add Device” on the main page.
- Wait to let the Device Discovery to complete.
The setup process is completed finally and all your discovered devices can be controlled through your Alexa device now. You need to test if it works normally with your voice commands. For example, if a bulb is named “small Bulb” on Kasa, you can say “Alexa, turn on the small Bulb” and check if Alexa powers on this particular bulb.
Note: whenever you change the name of your smart device, you will have to discover this device again to let the name be updated.
Troubleshooting
If Alexa fails to discover devices, how can you solve the issue?
- Try rebooting the smart device and then re-discover on Alexa.
- Cross check if Kasa App can control the device remotely or not. If it is unable to do so, check your internet access and remote control settings.
- Why is the device’s status being shown “Offline” on Alexa?
- There could be a possibility that the Wireless connection could have been lost. Therefore, try to reboot the device and re-discover it on Alexa.
- Ensure that there is an Internet access on your router.
- Check whether the remote control function is turned off or on.
- There could also be an issue with the cloud server.
Вход в настройки роутера — http192.168.0.1
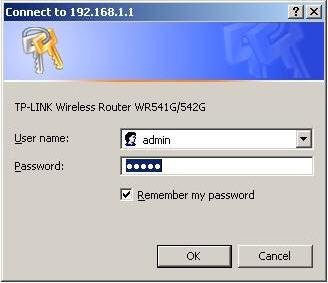
В комплекте со многими устройствами доступа идет диск с программой для быстрой настройки. К сожалению, с её помощью можно сделать только самые общие простые параметры — подключение к интернету или беспроводную сеть, а вот поменять пароль WiFi или открыть порт для игры с их помощью уже не получится. Поэтому, все действия с конфигурацией маршрутизатора лучше делать через веб-интерфейс. Его многие ещё называют «сайт модема», «сайт роутера», а некоторые даже — «личный кабинет». Это не совсем так. Это не сайт и не личный кабинет — это веб-конфигуратор. Для того, чтобы попасть в него, Вам надо запустить любой браузер (Internet Explorer, Chrome или Firefox) и в адресной строке набрать — http://192.168.0.1. Можно даже без http:// — это браузер подставит уже сам. Если всё настроено правильно, то в результате Вы должны получить запрос авторизации:
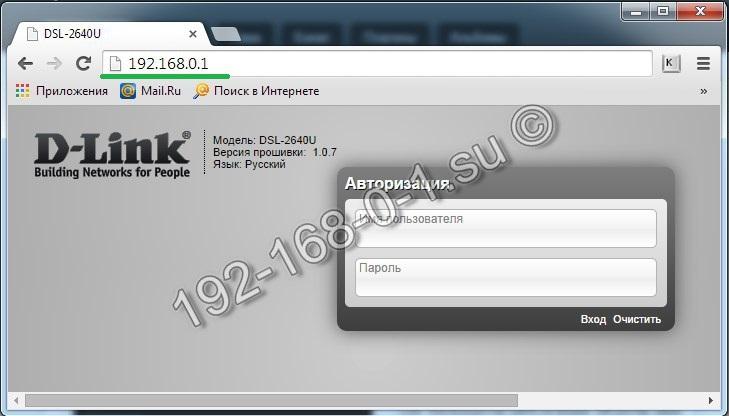
Если вдруг Ваш браузер по адресу 192.168.0.1 не находит ничего и пишет «страница недоступна», то в первую очередь надо проверить правильность набора адреса. Многие по ошибке или незнанию набирают неправильный адрес. Вот примеры таких ошибок — 192.168.0.l, 192.168.0.1.0, 192.168.0.0.0. Ещё одна распространенная ошибка — пользователь вместо адреса устройства набирает свой ай-пи — 192.168.0.2, 192.168.0.3, 192.168.0.254 и т.п.
Если же Вы правильно набрали адрес и всё равно получаете сообщение «страница недоступна», то первое что надо делать — это смотреть как настроена локальная сеть на Вашем компьютере. Что в Windows 7, что в Windows 8 и 8.1 — порядок действий одинаков:
1. Идем в в сетевые подключения. Для этого в панели задач (правый нижний угол, около часов) находим значок сети в виде мониторчика с коннектором и кликаем на него правой кнопкой мыши:
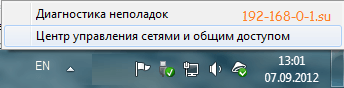
В открывшемся меню нужно выбрать пункт «Центр управления сетями и общим доступом». Откроется вот такое окно:

В меню слева надо выбрать пункт «Изменение параметров адаптера».
Кстати, есть способ быстрее. Нажимаем комбинацию клавиш WIN+R:

Результатом будет вот такое окошко:
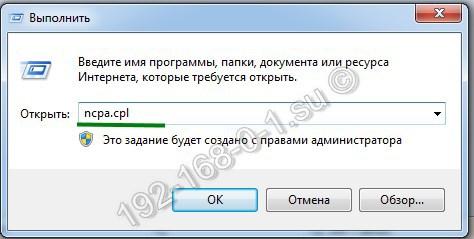
В строку «Открыть» набираем команду ncpa.cpl и нажимаем кнопку ОК. Откроются сетевые подключения Windows.
2. В сетевых подключениях ищем то, через которое компьютер включен в роутер:
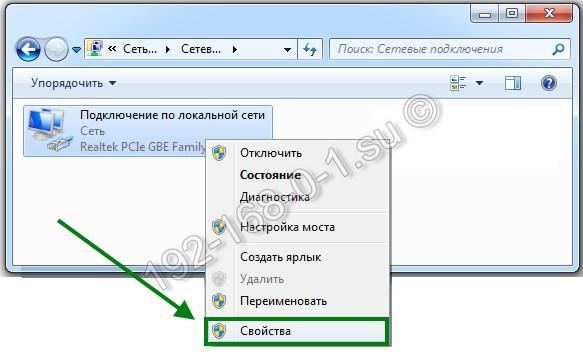
Если там одно подключение, как в примере, то вообще замечательно. Кликаем правой кнопкой на нём и в контекстном меню выбираем пункт «Свойства». В открывшемся окне свойств смотрим на список компонент и дважды кликаем левой кнопкой на пункте «Протокол Интернета версии 4 (TCP/IPv4)» для того, чтобы попасть в его свойства:
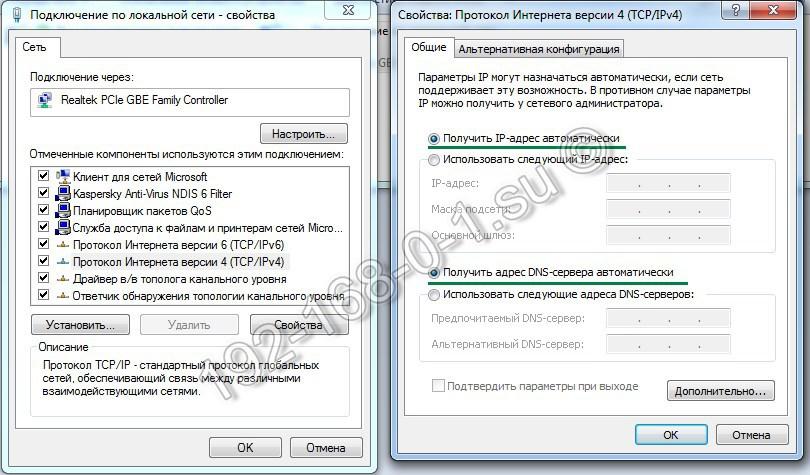
Если там всё установлено на автоматическое получение IP-адресов, то причины недоступности роутера через http://192.168.0.1 могут быть следующие:- на роутере отключен DHCP-сервер. Для решения переходим к шагу 3.- у устройства иной ай-пи адрес. Пробуйте в адресной строке вводить адреса: http://192.168.1.1 или http://192.168.10.1. Как вариант, можно посмотреть какой IP-адрес шлюза присваивается сетевому подключению. Сделать это можно набрав в командной строке Windows команду ipconfig.- модем или роутер неисправен. Пробуем сбрасывать настройки с помощью кнопки Reset.
3. Прописываем IP-адрес вручную. Для этого ставим точку на «Использовать следующий IP-адрес» и»Использовать следующие адреса DNS-серверов»:

В поля прописываем значения как на скриншоте. То есть:
IP-адрес — 192.168.0.2
Маска подсети — 255.255.255.0
Основной шлюз — 192.168.0.1
Предпочитаемый DNS-сервер — 192.168.0.1 В качестве альтернативного можно использовать публичный сервер Google — 8.8.8.8
Нажимаем кнопку ОК для применения настроек и пробуем снова зайти в настройки роутера через http://192.168.0.1 admin admin.
Модели устройств, для которых инструкция актуальна:

Роутеры и модемы D-Link — вход по http://192.168.0.1, admin / admin или пустая строка
Модели — DSL-2500(U/BRU/C),DSL-2520,DSL-2540(U/BRU/C),DSL-2600,DSL-2640(U/BRU/C),DIR-100, DIR-300, DIR-320, DIR-615, DIR-620, DIR-815, DIR-825

Роутеры и модемы TP-Link (ТП-Линк) — вход по http://192.168.0.1, admin / admin. Альтернативно можно вести вместо IP-адреса хостнейм роутера — tplinklogin.net
Модели- TL-WR702N, TL-WR720N, TL-WR740N, TL-WR741ND, TL-WR743ND, TL-WR841N, TL-WR841ND, TL-WR842ND, TL-WR843ND, TL-WR940N, TL-WR941ND, TL-WR1043ND

Роутеры Tenda — вход по http://192.168.0.1, admin / admin.
Модели — n3, n300, n304, w268r, n304, n630, w308r, w309r, w316r, w368r, w311m, w522u
TP-Link router setup via tplinkwifi.net
For undergoing the whole guide about setting up the TP-Link router through their dedicated web address www.tplinkwifi.net, you will primarily need to understand what www.tplinkwifi.net is. This custom web address from TP-Link is the main web link source or web domain for the users through which they can access the login page of the router setup.
The users once log into their device’s setup page can easily configure and start using the router within minutes of time, just read the instruction set carefully so that it can be set up in few minutes and some easy steps.
Below are some of the easy steps that you need to follow in order to get your TP-Link Wi-Fi router in working mode and experience its extravagant lightning fast network speed.
Initially, unbox all the router components like the router itself, Ethernet cables, power supply adapter etc. and assemble all these components accordingly and properly.
Connect the modem to the router in the WAN port and computer system to one of the LAN ports of the router with another LAN cable.
Now, what you need to do is switch on the power supply of the whole assembly that includes all these components and wait for few seconds until the networking device gets stable.
Open the web browser and input the web link www.tplinkwifi.net in the URL bar and enter the login username and password into the required fields. The login details credentials are case sensitive in nature.
Now, set up the internet connection in the Internet and WAN section under which you will need to select the connection type that you want to use.
Now, again fill in all the other details like the username and password etc. which are required for a successful internet connection setup and these details will be provided by your Internet service providers.
Tp-link router login steps
If you are going to set up and configure your Tp-link router, following are some of the easy to link router login steps that will be of great help to you.
Unpack the router component box and assemble all the important accessories of the router like the Ethernet cables and power adapter etc.
Now, connect the modem and the computer system to the router device with the help of the Ethernet/LAN cables.
Now, switch on the power supply of the networking equipment and wait for a while until the indicator LEDs on the front panel turn solid green or amber.
Open the web browser and type in the web address www.tplinkwifi.net in the URL bar of the browser and hit the enter key.
Authorize your login with a username and password for which the default assigned values are “admin” for both the cases.
In this way, the Tp-link router login can be done easily and quickly.
Tp-link router settings-all features
The TP-link router setting is referred to as the basic configuration and setup process through which all the major and minor operations on the Tp-Link router can be done.
Some of the main features of the TP-link router settings are listed below.
The users can configure their TP-link router to get it working in a few minutes of time and steps.
The TP-link router settings can be done also for upgrading the firmware of the router.
The users can also reset their router through these tp link router settings which imply to the accession of the setup page through this web link www.tplinkwifi.net.
Что есть 192.168.0.1 и с чем его едят
Каждое управляемое сетевое устройство представляет собой своебразный мини-компьютер со своей операционной системой
Не Windows конечно, а unix-based, но не суть важно.
И у каждого такого устройства есть свой IP-адрес. У WiFi-роутеров их два, как минимум
Один — это тот, который он подцепляет подключаясь к провайдеру. Второй — это адрес устройства в локальной сети. Так уж сложилось исторически, что подавляющее число производителей сетевого оборудования по умолчанию в качестве локального ай-пи использует адрес 192.168.1.1, а вот компания D-Link для своих роутеров DIR пошла почему-то по другому пути и выбрали адрес 192.168.0.1. По их стопам пошел так же китайский производитель Tenda и компания TP-Link. Правда с последним вообще весело получается — у одной и той же модели роутера, но с разной версией (v1, v2, v3 и т.п.) могут использоваться разные IP.
Updating Firmware for TP-Link WiFi Router using http tplinklogin.net Login Address
One of the most basic tp link WiFi router configuration is updating firmware for your wireless router. Firmware files for tplink router are available free of cost and you can download the tplink firmware update from tplink website. Here are the complete steps for updating firmware for your TP-Link wireless router.
- First of all, using tplink WiFi router configuration page download the Firmware for your TP-Link router. Firmware file will be available according to the model number of your TP-Link router. You will need to unzip the firmware file you have downloaded.
- Now, login for tplink WiFi router configuration page using http //tplinklogin.net address. fill the login user name and password for your router login access and select “Advance” option from there. After that you will need to choose “Backup & Restore” option under “System Tools”. This option will allow you to take pack up for your TP-Link router.
- After taking backup for your TP-Link router, go for “Firmware Upgrade” option under “System Tools”. You can choose the firmware file you have downloaded for your TP-Link router. also, you can check whether firmware update is available for your TP-Link router of not.
- After choosing the firmware file, you should click on “Upgrade” option. After updating the firmware your router will reboot itself.
- You can click on “Status” option to make sure that firmware file is reflected for your tplink WiFi router.
- You can also configure default settings for your tplink WiFi router using the backup file you have saved at you computer system.
There are many other advance level configurations you will need to reflect for your TP-Link WiFi router for example, you will need to change the login address for your TP-Link wireless router so that you can fully secure your router from anyone access. Here are explaining some simple steps for changing the default password for your TP-Link wireless router.
- From the address bar of your web browser you will need to enter the login address for TP-Link WiFi router. Default address for accessing TP-Link WiFi router is http //tplinklogin.net/. Enter this TP-Link router login address in the address bar and press enter key.
- You will now need to enter the default login details for your TP-Link WiFi router access. If you are using default login details for TP-Link router login then you will need to enter “admin” for both user name and password field.
- After login for TP-Link router setup page, you will need to go for “Access Control” under “Management” option. And then choose “Password” field. In the given options you will need to fill old password for one time and new password for twice.
- After entering the new passwords for given sessions you can save the settings you have made.
If you need to configure your TP-Link WiFi router for more advance settings, you can go for the blog session. From blogs you will get complete information for the issues that relates with TP-Link router setup and configurations.
14,043 total views, 6 views today
TP-Linkwifi.net
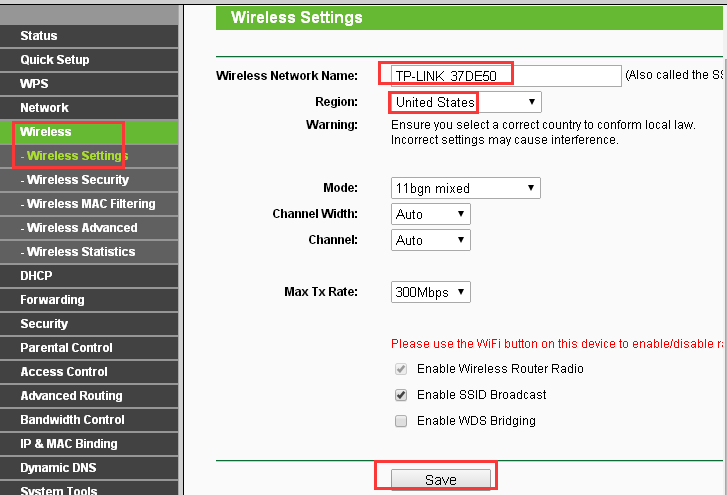
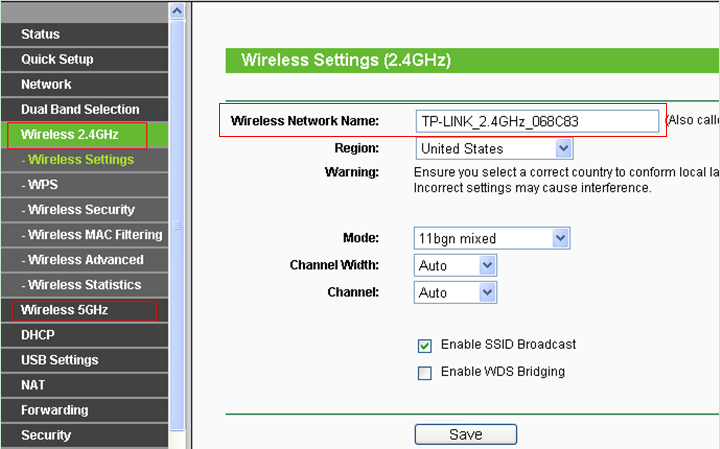
TP-Link Archer C3200 is a high tech wireless router. The tri-band technology allows us to connect multiple devices at a time without dropping the internet speed. The six external antennas on the top of the Router give an impeccable combined speed of more than 3200 Mbps on all the bands. The smart connect in the TP-Link Archer model helps to connect and running the devices faster.
TP-Link is one of the best names in the production of the networking hardware equipment. TP-Link has a vast variety of best wireless routers, modems, Wi-Fi range extenders, power adapters etc.
How can we set up our TP-Link router through http://tplinkwifi.net?
In the earlier days, users have to face a lot of issues while logging in to their wireless routers. Therefore, the TP-Link came up with an innovative idea of creating the web domain www.tplinkwifi.net which we can use to log in to the TP-Link wireless router. The TP-link router setup, update, and configuration all can be done through entering this link www.tplinkwifi.net in the address bar of the browser.
Login to the TP-Link router via tplinkwifi.net
Here, in this section, we will show you how to configure your TP-Link router. Following instructions on the TP-Link router setup should be understood thoroughly in order to log in and set up the TP-link router easily and swiftly.
- Open the router packing and assemble the components enclosed in it.
- Connect the power supply of the router and switch on the power supply.
- Connect the router to your computer through the Ethernet LAN cable and make sure the connection is made properly.
- Open the web browser on your computer and enter the web domain www.tplinkwifi.net in the address bar and hit the enter key.
- The next page will ask for the username and password to log in. The default value for the username and password is “admin” and “password”.
- Upon logging in to the setup page, you will see some options like “Internet WAN” and “Reset” etc.
- Click on the Internet WAN tab and select the appropriate connection type PPPoE.
- Now, follow the on-screen instructions to configure the rest of the pending configuration.
- Click the Apply and Save changes Your TP-Link router will be rebooted itself.
The rebooting process will take a few seconds or a minute. Wait for the rebooting process patiently and make sure the reboot is done properly without any interruption.
Now, your TP-Link router will be configured with the new settings and all you can use your router to the optimal level. However, if you are not able to log in through the web address www.tplinkwifi.net, try to login to the router through the default IP address 192.168.1.1 or 192.168.0.1.
Resetting your TP-Link router tplinkwifi.net
If you face any problem in the working or configuration of the router, you can log in to the router via tplinkwifi.net and select the Router reset tab. Upon clicking on the reset tab your TP-Link router will restart automatically and all the settings on it will be erased. Note that after the reset, you will need to reconfigure your router with the new credentials all again.
TP-link router setup and installation guide
Tp-Link has been one of the best and reliable networking hardware providers in the world for its potential and existing customers. There are very few brands in the market that can compete with TP-Link in terms of providing some of the networking devices like routers and modems as well as some other networking hardware like range repeaters and access switch points etc. All these high-end networking devices from TP-Link needs to be configured accordingly with the required settings without which the router, as well as modem, are almost useless as these devices will not render any of their service for which they are built.
Factory Default Login Default for Majority TP-Link WiFi Router
192.168.1.1 Admin tp link User Name: admin
192.168.1.1 Admin tp link Password: admin
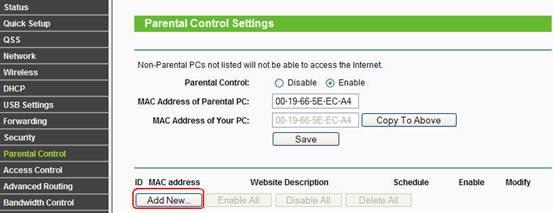
TP-Link Router Configurations for Parental Controls
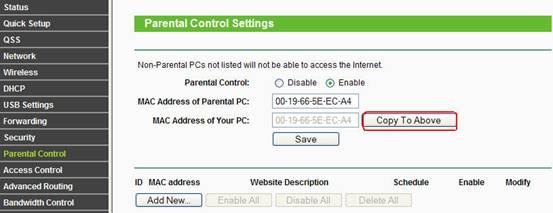
Tplink router setup page allow you to make parental controls for your home network. If you are a parent and you want to block certain websites for your network you can do this using parental controls settings for your TP-Link router. 192.168.1.1 admin tp link router can block websites and internet content so that you can feel relaxed about the online material your family members are accessing using WiFi signals.
Here are the Steps for Setting Up Parental Controls for TP-Link WiFi Router
Login to tplink router setup page using http //tplinklogin.net/ default address. If you are not getting login for your TP-Link WiFi router using 192.168.1.1 IP address. You will need to fill the login user name and password for your TP-Link WiFi router and then you will able to access the tplink WiFi router configuration page.
You will directly find the “Parental Control” option from left side menu simply clicks on that option. Once your click on “Enable” option you will need to fill the MAC address for the computer system you want to apply the parental control settings.
- For creating a new rule for parental control using 192.168.1.1 admin tp link page click on “Add New” option.
- A new window will appear on your screen where you can configure the parental controls for your TP-Link WiFi router.
- If you want to set the “Time” settings you will need to click on “Time Settings” option from 192.168.1.1 admin tp link page. You can now set the timings for your wireless router.
- Now, you can click on “Schedule” tab so you can configure the scheduling for the parental controls. Click on “Save” button for saving all the configurations you have made for tp link router setup page.
- You will need to enable the parental controls after making above settings. You can go back and check “enable” option so that you can make sure that parental controls are now activated for your home network.
These are the simple steps for making parental controls for your tplink WiFi router. You can also make many other kind of settings using 192.168.1.1 admin tp link address for your TP-Link WiFi router. Firmware for TP-Link WiFi router can be changed easily using this default login address. Experts always suggest that you must change the firmware for your router and WiFi extender whenever possible. Please make a visit at our blog session where you will find useful articles that relates to www.tplinklogin.net, tplinklogin.net admin, tplinklogin.net login, tplinklogin net login, tp link router login, 192.168.1.1 admin tp link, tp link login, tp link router setup page, tp link quick setup, http //tplinklogin.net quick set up, and tp link wifi router configuration
27,959 total views, 14 views today
TP-link router password changereset
The users of this TP-Link networking hardware need not to panic if they have forgotten the router login password as Tp-link has made proper arrangement in the home page of the router setup portal.
Resetting the Tp-link router password
Open the web browser of your PC and enter the web link www.tplinkwifi.net or the default IP of the router.
Authorize the access with a username and password that you have set earlier.
Now head straight towards the Wireless security tab and click it. You will be asked to provide the old password and then enter the new password. Confirm the new password by entering it again and your router is all set with a new set of login password.
Не заходит на 192.168.0.1. Что делать
Много решений на эту тему я писал в отдельной статье: что делать, если не заходит в настройки роутера на 192.168.0.1 или 192.168.1.1. Здесь мы рассмотрим основные и самые частые проблемы и решения.
Для начала:
- Проверьте, подключен ли ваш компьютер (если вы заходите с компьютера) к роутеру (модему). Если у вас подключение по сетевому кабелю (LAN), то иконка со статусом соединения должна быть такой (один из двух вариантов):
Если подключение по Wi-Fi: - Убедитесь, что адрес роутера 192.168.0.1 вы прописываете именно в адресной строке браузера. Многие делают это в строке поиска.
- Отключите встроенный в Windows брандмауэр.
- Отключите на время сторонний антивирус.
- Перезагрузите роутер и компьютер.
- Попробуйте зайти в настройки с другого устройства.
- Если подключение к маршрутизатору по кабелю, то попробуйте подключить сетевой кабель в другой LAN-порт.
Проверяем настройки IP, если не заходит в настройки роутера
Нам нужно открыть свойства подключения, через которое мы подключены к роутеру. Для этого зайдите в «Центр управления сетями и общим доступом», и перейдите в «Изменение параметров адаптера».

Если подключение по Wi-Fi, то нажимаем правой кнопкой мыши на «Беспроводная сеть» (Беспроводное сетевое соединение). Если же подключение по кабелю, то нажимаем на «Ethernet» (Подключение по локальной сети). Выбираем «Свойства».

Дальше выделяем строчку «IP версии 4 (TCP/IPv4)», и нажимаем на кнопку «Свойства». Выставляем автоматическое получение параметров и нажимаем «Ok».
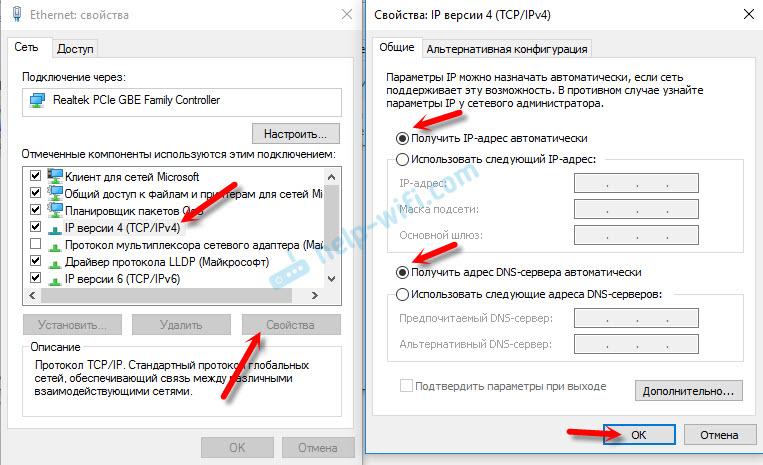
После перезагрузки компьютера пробуем зайти на адрес 192.168.0.1. Если не поможет, то можно попробовать прописать адреса вручную. Примерно так:

После перезагрузки снова пробуем получит доступ к настройкам роутера. Если и это не помогло, то скорее всего придется делать сброс настроек роутера. Об этом подробнее ниже.
Не подходит admin и admin по адресу 192.168.0.1
Не редко бывает ситуация, когда страничка авторизации все таки открывается, но после ввода логина и пароля admin ничего не происходит. Страничка просто перезагружается, или появляется сообщение, что пароль неверный.
Для начала посмотрите на корпусе роутера, какой пароль и логин используется по умолчанию в вашем случае. Если все таки это admin и admin, то скорее всего пароль (и/или логин) был изменен в настройках роутера. Поэтому, если вы его не помните, то скорее всего придется делать сброс настроек роутера, и настраивать его заново. Если это проблема не аппаратная, и после сброса настроек вы сможете зайти в панель управления.
Важно! Вполне возможно, что после сброса настроек, интернет через роутер перестанет работать (если он до этого работал). И я не могу гарантировать, что это решит проблему со входом в настройки роутера
Если все таки удастся зайти на 192.168.0.1, то вы сможете настроить свой роутер заново.
Сброс настроек сделать не сложно. Достаточно найти на роутере кнопку Reset (Сброс), нажать на нее, и подержать примерно 10-15 секунд. Как правило, эта кнопка утоплена в корпус, так что ее нужно нажимать чем-то острым.

После сброса настроек, для доступа к панели управления нужно использовать заводской адрес, имя пользователя и пароль, которые указаны на самом устройстве, или в инструкции.
75
Сергей
Советы по настройке роутеров (общие)