How to Fix DNS Server Unavailable Error
Содержание:
- Fixes for DNS server not responding
- Причины появления технической ошибки DNSerror
- Техническая информация ошибка dnserror как исправить сбой DNS в Яндекс.Браузере и других обозревателях, что за ошибка ДНС
- Способы исправления DNSerror
- DNS Server Unavailable Fixes
- How to Fix DNS Server Not Responding Problem in Windows 10
- Learn How To Fix DNS Lookup Failed Error
Fixes for DNS server not responding
If you’d like to know why you can’t browse the Internet due to ‘DNS server not responding, you can go to read the . Otherwise, follow along with the solutions directly.
Here are 4 solutions according to different reasons. You may not have to try them all; just work your way down the list until you find the one that works.
Bonus Tip: Try using VPN to fix the connection problem.
Note: The screens shown below are from Windows 10, but all the methods also apply to Windows 7/8.
Why can’t I access websites when DNS server not responding?
First, let’s firgure out what a DNS server is. DNS(Domain Name System) server helps to translate the website address into the IP address for your browser to connect to.
For example, when you want to access our website: www.drivereasy.com on Chrome, the DNS server translate it into our public IP address: 144.217.68.24 for Chrome to connect to.
So you may know if there’s any wrong with your DNS server, you cannot access any website on your browser. No exception that if your DNS server stops responding, you cannot access the websites through the Internet.
Solution 1: Correct your DNS server address
This problem could be probably caused by your incorrect DNS server address. So you can follow these to correct your DNS server address:
- On your keyboard, press the Windows logo key and R at the same time to invoke the Run box.
- Type control and press Enter.
- Click Network and Sharing Center in Large icons.
- Click Change adapter settings.
- Right-click on Local Area Connection, Ethernet or Wi-Fi according to your Windows. Then click Properties.|
- Click Internet Protocol Version 4(TCP/IPv4), then Properties.
- Tick on Obtain an IP address automatically and Obtain DNS server address automatically. Then click OK.
- Click Internet Protocol Version 6(TCP/IPv6), then Properties.
- Tick on Obtain an IP address automatically and Obtain DNS server address automatically. Then click OK.
- Try to access the website you want to go again and see if it succeeds.
Solution 2: Clear your DNS cache and reset your IP
- Type cmd in the search box from the Start menu. Then right-click on Command Prompt to select Run as administrator.
Note: Click Yes when prompted by the User Account Control.
- On the open black window, type the following commands and press Enter after each.
ipconfig /flushdns ipconfig /registerdns ipconfig /release ipconfig /renew
- Try to access the website you want to go again and see if it succeeds.
Solution 3: Update your network adapter driver
This problem could be also caused by an old or incorrect network adapter driver. You can update your network adapter driver manually or, if you’re not confident playing around with drivers, you can do it automatically with .
Driver Easy will automatically recognize your system and find the correct drivers for it. You don’t need to know exactly what system your computer is running, you don’t need to risk downloading and installing the wrong driver, and you don’t need to worry about making a mistake when installing.
You can update your drivers automatically with either the FREE or the Pro version of Driver Easy. But with the Pro version it takes just 2 clicks (and you get full support and a 30-day money back guarantee):
- and install Driver Easy.
- Run Driver Easy and click the Scan Now button. Driver Easy will then scan your computer and detect any problem drivers.
- Click Update All to automatically download and install the correct version of all the drivers that are missing or out of date on your system (this requires the – you’ll be prompted to upgrade when you click Update All).Note: You can do it for free if you like, but it’s partly manual.Note: Driver Easy requires network connection to update driver. If your windows can’t access the Internet, please use thefeature of Driver Easy to help you.
- After updating your network adapter driver, please restart your computer. Try to access the website you want to go again and see if it succeeds.
Solution 4: Restart your modem and router
If your modem or router doesn’t work properly, the DNS server could stop responding, either. You can restart your modem and router if you have one to solve the problem.
- Press the power button of your modem or router to power off, then wait for a while and press the power button again to start it again.
- Try to access the website you want to go again and see if it succeeds.
Hopefully this article has helped you fixed the problem. Feel free to comment below with your own experiences and share with your friends or colleagues if they’re experiencing the same problem.
Причины появления технической ошибки DNSerror
Процесс соединения пользователя с интернет-сайтом, с технической точки зрения, представляется как цепочка, по которой проходит запрос от браузера до ближайшего DNS-сервера, где сопоставляется имя ресурса с его IP-адресом, соединение с ним и возврат содержимого веб-страницы обратно на браузер.

В зависимости от того, что помешало нормальному течению этого процесса, и различаются причины появления DNSerror, они сводятся к следующим:
- проблемы с интернет-подключением;
- изменения в доменном имени;
- ошибки у провайдера;
- блокировка веб-ресурса со стороны провайдера;
- приостановка функционирования сайта из-за работ по его техническому обслуживанию;
- вирусная активность;
- нарушение целостности базы данных на DNS-сервере;
- внесение сайта в черный список файрволла, антивируса;
- повреждения кеша DNS на локальном компьютере.
Распространенной причиной появления проблемы DNSerror являются и ошибки в браузере. Чаще всего случаются неисправности типа DNSerror в «Яндекс.Браузере».  Грешит этим и Google Chrome. Нормальному соединению с веб-ресурсом мешают и другие причины вплоть до плохой погоды и рельефа местности, которые влияют на качество связи и возникновения DNSerror.
Техническая информация ошибка dnserror как исправить сбой DNS в Яндекс.Браузере и других обозревателях, что за ошибка ДНС
DNS – это система доменных имен, своего рода телефонная книга для компьютеров. ДНС сервера преобразовывают IP адреса в обычные для человеческого восприятия названия сайтов — вводите название в поисковой строке браузера, и веб-страница загружается и отображается на мониторе пользователя.
Иногда вместо отображения сайта выскакивает надпись о ошибке dnserror (в Google Chrome, Яндекс.Браузере или любом другом), а внизу на значке подключения к интернету отобразится желтый треугольник.
Почему возникает ошибка
На мониторе появляется надпись вместо открытия страницы: «Техническая информация: ошибка dnserror». Сбой DNS может свидетельствовать о неправильных настройках подключения к интернету. Кроме этого могут быть проблемы и с роутером пользователя, а также с DNS-серверами провайдера или поставщика услуг интернет.
Основные причины:
- устарели драйвера сетевой карты устройства;
- неправильно настроен роутер или указаны DNS имена;
- нет выхода в сеть;
- компьютер может быть заражен вирусом.
Способы исправить ошибку
Первое, что пользователь должен будет сделать – это запустить диагностику проблем подключения к всемирной паутине.
Нажимаете на значок монитора в правом нижнем углу панели задач правой кнопкой мыши и выбираете пункт «Диагностика неполадок». Устройство самостоятельно разберется с проблемой.
Если этот метод не помог, то перейдите к следующему:
- При подключении компьютера или ноутбука к сети через роутер, перезагрузите это устройство. Отключите устройство от сети и подождите две, три минуты. Затем обратно вставьте вилку роутера в розетку.
- Теперь выключите и включите компьютер.
- Если все равно нет интернета, попробуйте подсоединить интернет кабель напрямую к компьютеру. Если этот способ сработает, то проблема с роутером. Если нет, то перейдите к углубленной проверке выявления причин ошибки.
Проверить DNS службы
Следует проверить корректность работы служб ДНС:
- Зайдите в панель управления, выберите папку «Администрирование».
- В открывшемся окне выберите «службы». Кликните по этому пункту.
- Кликаете по пункту DNS клиент. Если во вкладке «Состояние» будет указано «Отключено», то выбираем «Включить».
- Тип запуска выставляете «Автоматический». А снизу кликаете по кнопке «Запустить».
Устраняем ошибку — Не удалось загрузить плагин в Google Chrome
Сбросьте параметры сети
В случае ошибки dnserror может помочь полный сброс настроек сети:
зайдите в панель управления и найдите вкладку «Сеть и интернет»;
кликаете по кнопке «Подключение к интернету». Справа на экране появится столбик с подключениями. Выбираете свое подключение, отключаете его, а затем подключаете заново.
Удаление вируса
Здесь все просто:
- купите антивирусную программу Eset Nod 32 или антивирус Касперского;
- установите это приложение на персональное устройство и запустите;
- просканируйте ей компьютер на наличие вирусов;
- удалите вредоносные файлы, если утилита найдет вирусы.
Исправление адресов DNS вручную
Если ничего из вышеперечисленного не помогло, попробуйте поменять настройки серверов вручную. Общие сервера для всех клиентов «8.8.8.8» и «8.8.4.4». Эти числа надо прописать в настройках сети.
Сделать надо следующее:
- кликаете правой кнопкой мыши по значку компьютера в нижнем углу экрана. Находите «Центр управления сетями и общим доступом»;
- в появившемся окне, в столбце слева нажимаете «Изменение параметров адаптера»;
кликаете два раза левой кнопкой мыши по значку Ethernet;
в окне кликаете на пункт «Свойства». И ищете в нем протокол Интернета версии IPv4 и кликаете по нему два раза;
появится окно, где нужно будет поставить галочку напротив пункта «Использовать следующие адреса DNS». В первой рамке введите «8.8.8.8», а во второй «8.8.4.4». Кликаете «Ок»;
Проверка маршрутизатора
Если интернета до сих пор нет и ошибка ДНС не исправлена, то необходимо проверить настройки маршрутизатора:
набираете в адресной строке браузера адрес входа в настройки роутера. Чаще всего это 192.168.0.1 и 192.168.1.1. И в открывшемся окне вводите логин и пароль, обычно Admin/Admin;
откроется веб интерфейс роутера. Найдите в нем вкладку «WAN». Она находится в пункте «Сеть»;
кликаете по ней. Справа в открывшемся окне прописываете те же самые ДНС сервера, которые указывали на компьютере;
Исправляем размытые шрифты в Windows 10
После этого рекомендуется перезагрузить и роутер, и компьютер, чтобы настройки вступили в силу.
Способы исправления DNSerror
При возникновении ошибки DNSerror система ничего не сообщает пользователю о ее причинах.
В связи с этим для ее устранения придется перепробовать несколько способов. Практика показывает, что часто причиной возникновения DNS error являются проблемы на самом сайте. Поэтому в большинстве случаев достаточно просто повторить попытку входа на сайт спустя некоторое время. Если же и после этого ошибка не исчезла, нужно предпринять более конкретные действия.
Проверка DNS-служб
На локальном компьютере при возникновении ошибки ДНС следует обратить внимание на такие моменты:
- Работает ли служба «DNS-клиент». Чтобы убедиться в этом, необходимо открыть с помощью щелчка ПКМ по иконке «Этот компьютер» (или «Мой компьютер» в зависимости от версии Windows) — окно управления компьютером — и перейти там в раздел «Службы». Если служба отключена, попробовать включить ее. Необходимо также удостовериться в том, что активирован автоматический запуск данной службы.
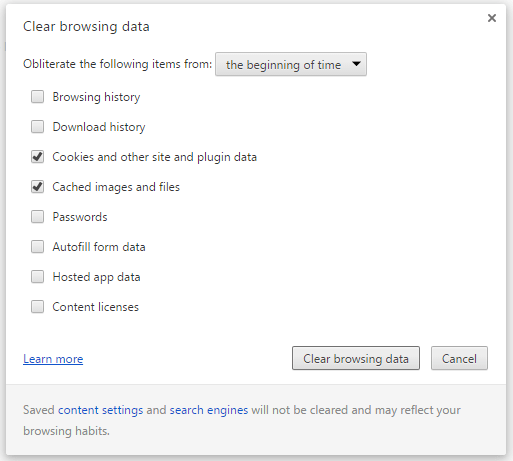
- При возникновении DNSerror-ошибки на «Яндекс.Браузере» удалить файлы cookie и почистить кэш. Для этого войти в настройки браузера и в пункте «Дополнительно» выбрать «Очистить историю». Далее галочками отметить нужные пункты и нажать на одноименную кнопку очистки. В Google Chrome подобные действия выполняются тем же способом.
Следует отметить, что вышеописанные манипуляции могут и не понадобиться. Часто для устранения ошибки DNSerror достаточно просто перезагрузить компьютер.
Сброс параметров сети
Если действия, описанные в предыдущем разделе, не привели к желаемому результату, исправить ошибку DNSserror, связанную с получением информации о доменах, получится при помощи сброса параметров сети. Это более серьезная операция, для ее выполнения применяются способы:
- через командную строку;
- с помощью утилиты Microsoft Easy Fix.
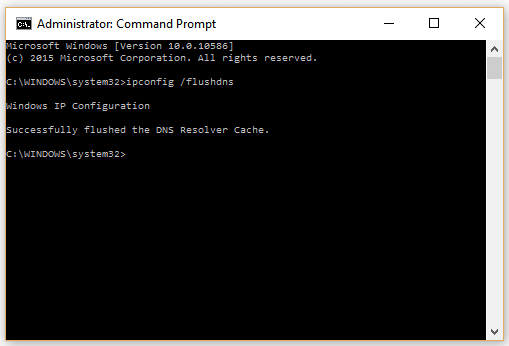
Возвращение сетевых настроек к заводским параметрам производится не только при появлении DNSserror. Поэтому для начала попробовать сбросить только настройки ДНС. Для этого необходимо вызвать командную строку, набрав в диалоговом окне (вызывается с помощью команды «Выполнить» в меню «Пуск» или комбинацией клавиш Winkey+R) команду cmd. 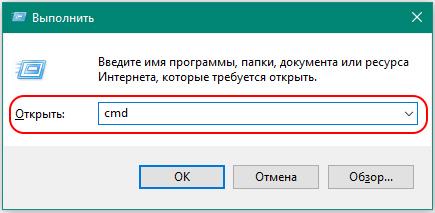 Затем в командной строке необходимо ввести ipconfig /flushdns. После того как команда отработает, попытаться снова подключиться к требуемому ресурсу.
В случаях, когда сброс кэша ДНС не помог, необходимо там же ввести другую команду: netsh winsock reset. 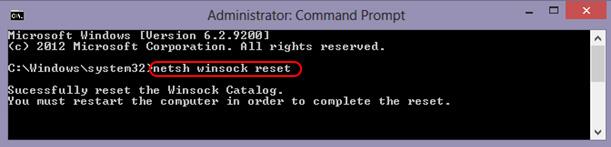 Ее можно выполнить также в паре с командой netsh int ip reset c:\resetlog.txt.
  Таким образом произойдет сброс параметров сети. После него следует выполнить перезагрузку компьютера. В отдельных случаях понадобится повторная настройка подключения к интернету.
Утилита Microsoft Easy Fix выполняет сброс настроек протокола TCP/IP. Скачивается по адресу: support.microsoft.com/ru-ru/help/299357/how-to-reset-tcp-ip-by-using-the-netshell-utility.  Затем достаточно просто запустить ее и нажать на кнопку «Далее». Утилита произведет требуемые изменения и запросит перезагрузку. После этого проблема с DNSserror должна решиться.
Вирус
Многие компьютерные вирусы способны вносить изменения в настройки ДНС или отключать эту службу. Поэтому при возникновении DNSerror не будет лишним проверить свой компьютер на их наличие. Какую именно антивирусную программу для этого использовать — дело личных предпочтений пользователя.
Проблемы с доступом к веб-страницам возникают не только из-за вирусной активности, но и вследствие неправильной работы антивирусных программ. Наталкивает на мысль об этом ситуация, когда DNSerror появляется при попытке доступа к какому-либо конкретному домену, а в остальном интернет функционирует нормально.
Для проверки нужно загрузить компьютер в безопасном режиме с поддержкой сети и попытаться подключиться к проблемной веб-странице. 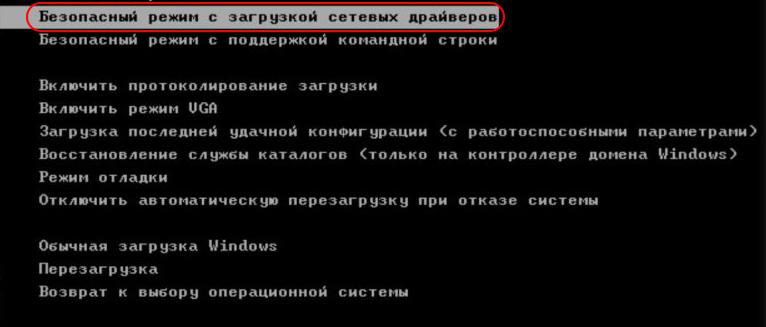 Если подключение устанавливается нормально, значит, проблема в антивирусе. Чтобы устранить неполадку, переустановить антивирусник или проверить настройки файрволла, удалив нежелательные фильтры.
Исправление адреса DNS вручную
В случае если проблема с доступом к веб-ресурсам связана с ошибками в работе DNS-сервера провайдера, есть шанс исправить ошибку DNSerror при установке адреса ДНС вручную. Для этого необходимо:
После выполнения вышеуказанных действий перейти к проверке доступа к желаемому сайту.
Are you a broadband internet user? Do you connect directly to the router to stay connected to the internet? If yes, the first thing you can try to do is reset your router. Sometimes this can resolve minor problems with your router’s connectivity. In order to reset your router, you must locate the reset button. Once found, press and hold this button (you might need a pin to do so)to reset your router. After resetting your router, restart your PC and try connecting to the internet once more.
Flush DNS
One time, when the DNS server unavailable windows 7 error popped up, I had to flush the DNS on the Windows 7 computer. This, of course, works for Windows 8 and Windows 10 as well. Follow these instructions in order to “flush the DNS”.
| Did you know? One of the many DNS errors includes the dns_probe_finished_nxdomain error. Read how to fix the dns_probe_finished_nxdomain error for more info. |
- Open the Run dialog box. For that press Windows Key + R and type “cmd.exe” and hit enter.
- Now, copy & paste the commands below in the Command Prompt that launched. You need to hit enter after copying each line.
ipconfig /flushdns
ipconfig /release
ipconfig /renew
exit
After the commands complete, restart your computer. More than likely, this will have solved the “DNS server might be unavailable” problem on your Windows computer. You should now be able to access the internet without issue.
Change DNS Settings
The ipconfig /flushdns command flushes the DNS cache. A flushed cache erases any modifications in the DNS settings and the system.
- Once done, Hold Windows key and press R again.
- Now, type ncpa.cpl and Click OK.
It takes you to the network connections, and you need to update your DNS settings via the interface.
- Select the network connector or connection that you wish to troubleshoot (Wi-Fi or Ethernet adapter).
- Right click it, then choose Properties.
- Via the properties panel, click “Internet Protocol Version 4 (TCP/IPv4)”until it turns gray and selectProperties again.
- Check or select use the following DNS server addresses and enter the following for Preferred DNS Server and Alternate DNS Server
Preferred DNS SERVER: 8.8.8.8
Alternate DNS SERVER 8.8.4.4
Click OK and close the rest of the windows. Watch the video on the next page to learn how to do the actions above.
Video: dns server unavailable windows 10
| Did you know? One of the many DNS errors includes the dns_probe_finished_bad_config. Read how to fix the dns_probe_finished_bad_config error for more info. |
Thanks for reading how to resolve DNS Server Unavailable: Fix Windows 7, 8, Windows 10, Chrome. If this guide provided the information you needed, please share it so that others may get the help needed. If you have any tips or question, then leave us a comment below!
How to Fix DNS Server Not Responding Problem in Windows 10
Fix 1: Reboot your System and Modem Device:
First turn off your computer and Modem device completely and after few minutes turn on them.
This is the most basic option but sometime it will work and Fix DNS Server Not Responding Error on Windows 10/8/7.
If you are not able to fix this issue after applying the above-given trick then follow the below solutions.
Fix 2: Fix DNS Errors using CMD
1: Open Command Prompt with an Administrator privilege.
2: After it, execute below-given commands one by one.
This will flush the DNS and fix DNS errors. After executing these commands, reboot your PC and check your Internet Connection.
Fix 3: Change the DNS Addresses
1: To do this, right click on the network icon and select “Open Network and Sharing Center” option.
2: After it, click on the “Change adapter settings” and right-click on your network connection and click Properties.
3: After it, choose “Internet Protocol Version 4 (TCP/IPv4)” and click Properties.
4: Add below-given DNS server addresses.
 That’s it. At last, close all the open dialog boxes and check your Internet, if it worked then enjoy.
Fix 4: Set Physical Address as Network Address:
Apply the below-given steps to know “How to Set Physical Address as Network Address”.
- Open command with admin privilege to run all the below-given command without any error.
- Enter ipconfig/all and press ENTER key to run it.
- This command will display the connection detail of your computer system. Note down the Physical Address.
For Example: In the below-given image: 2A-3E-8E-B8-30-C9.

- After it, Press Windows + R key to open RUN dialogue box.
- In the run dialogue box Window typecpl and hit ENTER key.
- Here, right-click on your connected Network Connection and choose Properties
- Now, click onConfigure button -> Advanced
- under Advanced tab -> click on Network Address
- Now, choose Value field and Enter the Physical address in this field. Click on the OK button and Exit.
Now, check that your internet connection is working or not. Open your web browser and try to open any webpage.
If not, then follow the below tricks to Fix dns server not responding windows 10.
Fix 5: Turn off Firewall/Antivirus:
Installed antivirus or Firewall tools may block the internet connection and DNS error may appear,
so it is recommended to make sure that your system’s firewall or antivirus is ok and not interrupting the Internet Connection.
Sometimes it becomes the prime cause of DNS Server Not Responding Error on Windows 10/8/7.
So, if you are using any firewall or antivirus, disable them and see if the issue is fixed or not.
Summary
Article Name
5 Tricks to Repair “DNS Server Not Responding Error” in Windows 10 PC/Laptop
Description
Easily get rid of DNS Server Not Responding error, simply follow the given steps and fix DNS Server Not Responding with ease.
Author
Publisher Name
FIX PC ERRORS
Publisher Logo
Learn How To Fix DNS Lookup Failed Error
As I said above, if DNS servers are timed out, DNS Lookup Failed error could appear on your Chrome browser.
By default, Windows PC (or any other operating systems, such as Mac OS or Linux) will automatically be pulled DNS details directly from the ISP (Internet Service Provider) and use them as default DNS servers.
However, these DNS servers are not stable and always time out. When it is timed out, it could lead to DNS errors.
In order to fix it, you just need to replace the default DNS server on your computer with a third-party DNS service, like Google’s DNS or OpenDNS. Both are excellent alternative DNS server services that recommended by many regular users and experts.
How To Change Default DNS Server On Your Computer
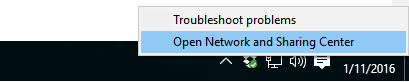
In order to change the default DNS server on your Windows computer, open Network and Sharing Center by right-clicking “Network icon” in the taskbar notification area, and then click “Open Network and Sharing Center”.
Next, click on the currently connected network adapter and select Properties.

In the next step, click on the “Internet Protocol Version 4 (TCP/IPv4”. It will show you two boxes to enter DNS servers you want to use. Take a look at the image below.
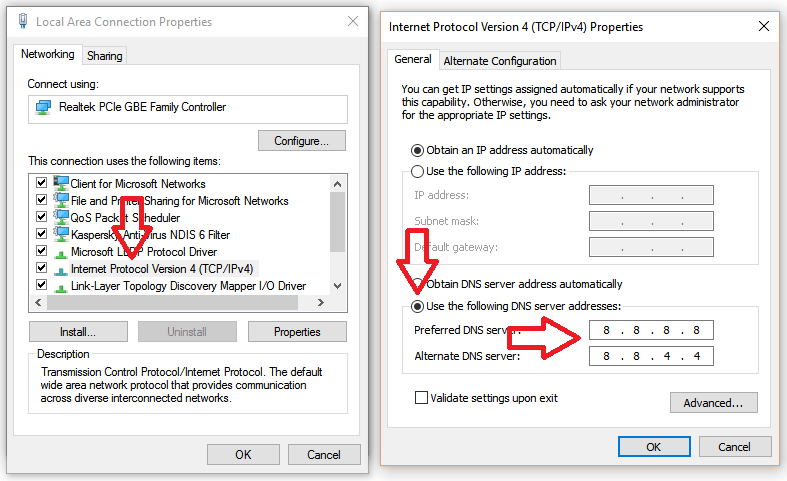
I often use Google’s DNS service with the following IP addresses: 8.8.8.8 and 8.8.4.4. Just fill up two boxes with these IP addresses and the error should be fixed immediately.
This method can also help you to fix many other DNS errors on your Windows computer, including Dns_Probe_Finished_Nxdomain and Dns_Probe_Finished_Bad_Config.
If you are facing any DNS errors, you should also try this solution.
Clear DNS Cache On Your Computer To Fix DNS Lookup Failed Error
If you have tried the method above, but the error persists, you can try to remove all DNS caches on your Windows PC with a simple command in Command Prompt.
As I mentioned above, wrong DNS information or expired DNS caches could be a cause of this DNS error. So if you want to fix it, just flush all DNS caches on your Windows computer.
In order to remove all DNS caches:
- Click on Start logo.
- Type cmd.exe in the Run dialog box.
- Right-click on the cmd.exe.
- Choose “Run as Administrator” to open Command Prompt program with administrator privilege.
- In Command Prompt program, type ipconfig /flushdns and press Enter.
That’s it!
To increase the successful percentage of this solution, you should also remove all caches and cookies of your Google Chrome browser. If you don’t know how to do that, read this article.
I hope you have fixed DNS Lookup Failed error on your Chrome browser with these methods. These solutions also help you to understand more about DNS errors and resolve other DNS problems.
If you have any questions about this error or other DNS errors, feel free to ask me by leaving your comment below.