genesisminingsgminer-gm forked from nicehashsgminer sgminer
Содержание:
Basic Usage
WARNING: documentation below this point has not been updated since the
fork.
After saving configuration from the menu, you do not need to give sgminer
any arguments and it will load your configuration.
Any configuration file may also contain a single
to recursively include another configuration file.
Writing the configuration will save all settings from all files in the
output.
Single pool:
Multiple pools:
Single pool with a standard http proxy, regular desktop:
Single pool with a socks5 proxy, regular desktop:
Single pool with stratum protocol support:
sgminer -o stratum+tcp://pool:port -u username -p password
The list of proxy types are:
http: standard http 1.1 proxy
http0: http 1.0 proxy
socks4: socks4 proxy
socks5: socks5 proxy
socks4a: socks4a proxy
socks5h: socks5 proxy using a hostname
If you compile sgminer with a version of CURL before 7.19.4 then some of
the above will not be available. All are available since CURL version
7.19.4.
If you specify the —socks-proxy option to sgminer, it will only be
applied to all pools that don’t specify their own proxy setting like
above.
For more advanced usage , run .
See for more information regarding GPU mining and
for more information regarding Scrypt mining.
Building
Dependencies
Mandatory:
Optional:
- curses dev library — on Debian or on WIN32, for text user interface
If building from git:
- autoconf
- automake
sgminer-specific configuration options:
Debian Example
AMD APP SDK and AMD ADL SDK must be downloaded from the amd websites.
*nix build instructions
If needed, place include headers ( files) from in .
Then:
To compile a version that can be used accross machines, remove
.
To compile a debug version, replace with .
Depending on your environment, replace with .
Systemwide installation is optional. You may run from the build
directory directly, or if you wish to install
to a system location or a location you specified with .
See for MinGW compilation and cross-compiation,
for building using Cygwin, or use the provided
Microsoft Visual Studio project (tested on MSVS2010), with
instructions in .
Кошмары и грезы майнера
Совсем недавно начинающий майнер действовал по принципу «настроил и забыл». Он выбирал криптовалюту, которая ему казалась наиболее перспективной, максимум их было две: основная и резервная. После чего прикидывал оптимальную конфигурацию «фермы» с учетом алгоритмов хеширования или покупал готовые ноды у оператора облачного майнинга. Затем настраивал и запускал собственно майнер — специфическую для каждого алгоритма консольную программу. Дальше требовалось задать оповещения о критических событиях и лишь изредка проверять, как там капают виртуальные монетки на столь же виртуальный счет.
Конечно, многие смотрели свою статистику по десять раз на дню и вскакивали ночью, но это уже психологические, а не технические особенности майнинга. В то время, когда Litecoin еще был «серебряным стандартом», постоянного контроля процесса не требовалось. Скорее было нужно терпение, и то небольшое.
Поначалу расчеты всем сулили быструю окупаемость вложений и получение прибыли уже в ближайшие месяцы (максимум — год). Однако время шло, и чем популярнее становилась выбранная криптовалюта, тем сильнее падали темпы ее майнинга на каждом узле из-за стремительно возрастающей сложности вычисления верного хеша в очередном блоке.
Когда я начинал писать эту статью, казалось, что «экскаватор» копает очень бодро. Он приносил 5,76 доллара в день, и с одной не самой крутой видеокарты это был бы отличный сбор.
Начало криптовалютного эксперимента, июнь 2017-го
Однако это был просто временный эффект биржевых игр. Как только кончился хайп и курсы выровнялись, та же система с теми же настройками стала приносить всего 2,13 доллара. В отдельные моменты система работала, считай, на холостом ходу, так как прибыльность падала ниже доллара в день. То же самое происходило и с другими криптовалютами, просто в разные периоды. Поэтому можно было снизить потери, вовремя переключившись на майнинг других монет.
Окончание криптовалютного эксперимента, июль 2017-го
У облачных операторов даже появился новый пункт в FAQ, объясняющий постоянное уменьшение выплат. В абсолютных числах производительность приобретенной системы оставалась неизменной, а вот ее относительная доля в общей сети майнеров часто падала быстрее, чем прогнозировал онлайн-калькулятор доходности.
Дополнительно повышались расценки на электроэнергию, появлялись новые чипы и новые алгоритмы. Непредсказуемости добавляют и биржевые штормы, из-за них возникают часы и даже дни, на протяжении которых майнинг выбранной криптовалюты становится откровенно убыточным.
К примеру, за один из коротких тестовых прогонов я намайнил в Decred эквивалент 18 рублей, а электросчетчик накрутил за то же время на 23 рубля. То есть в этот период мне пришлось заплатить больше, чем удалось получить за майнинг. Надо было приостановить его? Если да, то на сколько? Переключиться на другую криптовалюту? На какую? Хорошо, что сейчас не надо терзать себя этими вопросами посреди ночи, когда сработала очередная тревога. Есть универсальные системы майнинга, не привязанные к какому-то одному альткойну и снижающие финансовые риски.
Multipool
Failover strategies
A number of different strategies for dealing with multipool setups are
available. Each has their advantages and disadvantages so multiple strategies
are available by user choice, as per the following list:
Failover
The default strategy is failover. This means that if you input a number of
pools, it will try to use them as a priority list, moving away from the 1st
to the 2nd, 2nd to 3rd and so on. If any of the earlier pools recover, it will
move back to the higher priority ones.
Round robin
This strategy only moves from one pool to the next when the current one falls
idle and makes no attempt to move otherwise.
Load balance
This strategy sends work to all the pools on a quota basis. By default, all
pools are allocated equal quotas unless specified with —quota. This
apportioning of work is based on work handed out, not shares returned so is
independent of difficulty targets or rejected shares. While a pool is disabled
or dead, its quota is dropped until it is re-enabled. Quotas are forward
looking, so if the quota is changed on the fly, it only affects future work.
If all pools are set to zero quota or all pools with quota are dead, it will
fall back to a failover mode. See quota below for more information.
The failover-only flag has special meaning in combination with load-balance
mode and it will distribute quota back to priority pool 0 from any pools that
are unable to provide work for any reason so as to maintain quota ratios
between the rest of the pools.
Balance
This strategy monitors the amount of difficulty 1 shares solved for each pool
and uses it to try to end up doing the same amount of work for all pools.
Quotas
The load-balance multipool strategy works off a quota based scheduler. The
quotas handed out by default are equal, but the user is allowed to specify any
arbitrary ratio of quotas. For example, if all the quota values add up to 100,
each quota value will be a percentage, but if 2 pools are specified and pool0
is given a quota of 1 and pool1 is given a quota of 9, pool0 will get 10% of
the work and pool1 will get 90%. Quotas can be changed on the fly by the API,
and do not act retrospectively. Setting a quota to zero will effectively
disable that pool unless all other pools are disabled or dead. In that
scenario, load-balance falls back to regular failover priority-based strategy.
While a pool is dead, it loses its quota and no attempt is made to catch up
when it comes back to life.
To specify quotas on the command line, pools should be specified with a
semicolon separated —quota(or -U) entry instead of —url. Pools specified with
—url are given a nominal quota value of 1 and entries can be mixed.
For example:
—url poola:porta -u usernamea -p passa —quota «2;poolb:portb» -u usernameb -p passb
Will give poola 1/3 of the work and poolb 2/3 of the work.
Writing configuration files with quotas is likewise supported. To use
the above quotas in a configuration file they would be specified thus:
Extra File Configuration
If you want to store a number of pools in your configuration file, but
don’t always want them automatically enabled at start up (or restart),
then the «state» option with a value of «disabled» can be used:
It is then trivial to change the «state» setting to «enabled» in the
configuration file at anytime and then restart the miner (see below).
You can enable the pool whilst the miner is still running (‘p’ followed
by ‘e’ followed by pool number) — but the pool will still be disabled on
restart if the config file is not changed.
«state» can also be set to «hidden». This allows the json file to
contain a large number of pools, of which some could be automatically
culled at start up. This makes it easy to swap pools in and out of the
runtime selection, without having a large list of pools cluttering up
the display.
These options are considered experimental and therefore will NOT be
created when the ‘Write config file’ option is used (‘s’ followed by
‘w’).
A restart of the miner (‘s’ followed by ‘c’) will reload the config
file and any changes that may have been made.
Logging
sgminer will log to stderr if it detects stderr is being redirected to a
file. To enable logging simply append to your command line
and will contain all debug output unless you set
to , in which case it will only contain output at the log level you
specified (notice by default).
There is also the -m option on Linux which will spawn a command of your choice
and pipe the output directly to that command.
The WorkTime details ‘debug’ option adds details on the end of each line
displayed for Accepted or Rejected work done. An example would be:
The first 2 hex codes are the previous block hash, the rest are reported in
seconds unless stated otherwise:
The previous hash is followed by the getwork mode used M:X where X is one of
P:Pool, T:Test Pool, L:LP or B:Benchmark,
then D:d.ddd is the difficulty required to get a share from the work,
then G:hh:mm:ss:n.nnn, which is when the getwork or LP was sent to the pool and
the n.nnn is how long it took to reply,
followed by ‘O’ on it’s own if it is an original getwork, or ‘C:n.nnn’ if it was
a clone with n.nnn stating how long after the work was recieved that it was cloned,
(m.mmm) is how long from when the original work was received until work started,
W:n.nnn is how long the work took to process until it was ready to submit,
(m.mmm) is how long from ready to submit to actually doing the submit, this is
usually 0.000 unless there was a problem with submitting the work,
S:n.nnn is how long it took to submit the completed work and await the reply,
R:hh:mm:ss is the actual time the work submit reply was received
If you start sgminer with the —sharelog option, you can get detailed
information for each share found. The argument to the option may be «-» for
standard output (not advisable with the ncurses UI), any valid positive number
for that file descriptor, or a filename.
To log share data to a file named «share.log», you can use either:
./sgminer —sharelog 50 -o xxx -u yyy -p zzz 50>share.log
./sgminer —sharelog share.log -o xxx -u yyy -p zzz
Скачайте CGMiner для Windows XP на русском бесплатно
Обзор CGMiner
CGMiner – консольный клиент, предназначенный для майнинга криптовалюты. Позволяет управлять разгоном видеокарты и системой охлаждения, создавая Bitcoin, Ethereum, Litecoin и другие монеты.
Скриншоты
|
|
|
|
|


Похожие программы
SpeedFan
Google Earth
DirectX — пакет библиотек, необходимый системе для работы с мультимедиа
ArtMoney
Andy
Hamachi
Tunngle
Game Maker Studio — разработка игр и приложений под различные платформы
IObit Malware Fighter — для удаления вредоносных программ – троянов, кейлоггеров
Mobogenie
Nokia PC Suite
BlueStacks — программа для запуска android приложение на windows
360 Total Security — условно-бесплатное антивирусное программное обеспечение
Fences
Hotspot Shield
7-Zip — бесплатный архиватор для windows
Origin
CPU-Z
Driver Booster Free — программа для поиска и установки новых драйверов
Acronis Disk Director — пакет инструментов для работы с жесткими дисками компьютера
DriverPack Solution — для автоматической установки и обновления драйверов
Cheat Engine
VirtualBox — создание вирутальных машин
Reg Organizer — программное обеспечение для оптимизации и очистки компьютера
Bandicam — программа для снятия скриншотов и записи видео с экрана
Nox App Player — программа для запуска андроид игр и приложений на windows
2GIS
Razer Game Booster — программа для отключения неиспользуемых процессов
Punto Switcher
Radmin
Mathcad
Ammyy Admin
3DMark
Action!
FurMark
Xpadder
Adobe Dreamweaver
Driver Genius — сканирования и обновление драйверов на компьютере
PowerDVD — проигрыватель мультимедийных файлов
CheMax
GOM Player — медиапроигрыватель для Windows
FBReader
Cool Reader
Samsung Kies — подключение телефонов и смартфонов компании Samsung к ПК
Connectify Hotspot
MyPublicWiFi
Nero Burning ROM
Free Studio — пакет объединяющий более 40 мультимедийных программ
WinSCP
ImgBurn
FB2 Reader
FastStone Capture
EasyBCD
STDU Viewer
NVIDIA PhysX
ManyCam
Virtual Router
Dropbox
Adguard
Dr.Web CureIt! — бесплатная утилита для лечения компьютера от вредоносного ПО
Яндекс.Диск
Kaspersky Free — бесплатная версия антивируса от лаборатории Касперского
NOD32 — хороший антивирус для компьютера
iTunes — программа для синхронизации между мобильными устройствами Apple
Rufus
PRO100
Arduino
CGMiner
Maple
Visual Studio
Bitcoin Core
Глаз.ТВ
Kingo Root
Android Studio
Scratch
Firebird
Charles
NVIDIA GeForce
MinerGate
Microsoft .NET Framework — платформа создающая условия установки компьютерного ПО
Eclipse
NVIDIA Inspector — для работы с графической подсистемой
HWMonitor
Core Temp
Display Driver Uninstaller — для удаления устаревших драйверов видеокарт
VueScan
CrystalDiskInfo — диагностическая утилита для проверки жестких дисков
HDD Low Level Format Tool — утилита, предназначенная для форматирования жестких дисков
Ускоритель компьютера — оптимизация операционной системы Windows
Classic Shell
WinThruster — оптимизация операционных систем семейства Windows
Avast Free Antivirus — бесплатный Аваст антивирус для компьютера
Mcafee — антивирусная программа, для защиты компьютера от внешних угроз
Intel Driver
ASUS Update — утилита, предназначенная для обновления BIOS на компьютере
Clownfish
Evernote
GeForce Experience — автоматического поиск драйверов видеокарт компании Nvidia
Облако Mail.ru
CPU Control
Microsoft Security Essentials — антивирус для защищиты операционной системы
ActiveSync
BlueSoleil
Malwarebytes Anti-Malware — частично бесплатная антивирусная утилита
TV Player Classic
CyberGhost VPN
RivaTuner
PuTTY
Trend Micro HijackThis
VMWare Workstation
Supremo
AnyDesk
Rainmeter
RocketDock
Lightshot
TunnelBear
AMD Catalyst Control Center — программа для настройки видеокарт AMD Radeon
Аудио | Видео программы
Графические программы
Microsoft Office
Игры
Интернет программы
Диски и Файлы
Basic Usage
WARNING: documentation below this point has not been updated since the
fork.
After saving configuration from the menu, you do not need to give sgminer
any arguments and it will load your configuration.
Any configuration file may also contain a single
to recursively include another configuration file.
Writing the configuration will save all settings from all files in the
output.
Single pool:
Multiple pools:
Single pool with a standard http proxy, regular desktop:
Single pool with a socks5 proxy, regular desktop:
Single pool with stratum protocol support:
sgminer -o stratum+tcp://pool:port -u username -p password
The list of proxy types are:
http: standard http 1.1 proxy
http0: http 1.0 proxy
socks4: socks4 proxy
socks5: socks5 proxy
socks4a: socks4a proxy
socks5h: socks5 proxy using a hostname
If you compile sgminer with a version of CURL before 7.19.4 then some of
the above will not be available. All are available since CURL version
7.19.4.
If you specify the —socks-proxy option to sgminer, it will only be
applied to all pools that don’t specify their own proxy setting like
above.
For more advanced usage , run .
See for more information regarding GPU mining and
for more information regarding Scrypt mining.
Logging
sgminer will log to stderr if it detects stderr is being redirected to a
file. To enable logging simply append to your command line
and will contain all debug output unless you set
to , in which case it will only contain output at the log level you
specified (notice by default).
There is also the -m option on Linux which will spawn a command of your choice
and pipe the output directly to that command.
The WorkTime details ‘debug’ option adds details on the end of each line
displayed for Accepted or Rejected work done. An example would be:
The first 2 hex codes are the previous block hash, the rest are reported in
seconds unless stated otherwise:
The previous hash is followed by the getwork mode used M:X where X is one of
P:Pool, T:Test Pool, L:LP or B:Benchmark,
then D:d.ddd is the difficulty required to get a share from the work,
then G:hh:mm:ss:n.nnn, which is when the getwork or LP was sent to the pool and
the n.nnn is how long it took to reply,
followed by ‘O’ on it’s own if it is an original getwork, or ‘C:n.nnn’ if it was
a clone with n.nnn stating how long after the work was recieved that it was cloned,
(m.mmm) is how long from when the original work was received until work started,
W:n.nnn is how long the work took to process until it was ready to submit,
(m.mmm) is how long from ready to submit to actually doing the submit, this is
usually 0.000 unless there was a problem with submitting the work,
S:n.nnn is how long it took to submit the completed work and await the reply,
R:hh:mm:ss is the actual time the work submit reply was received
If you start sgminer with the —sharelog option, you can get detailed
information for each share found. The argument to the option may be «-» for
standard output (not advisable with the ncurses UI), any valid positive number
for that file descriptor, or a filename.
To log share data to a file named «share.log», you can use either:
./sgminer —sharelog 50 -o xxx -u yyy -p zzz 50>share.log
./sgminer —sharelog share.log -o xxx -u yyy -p zzz
NHM
Есть другая, исключительно простая в освоении и более универсальная программа для майнинга — клиент пула NiceHash Miner (NHM). Она поддерживает Claymore’s Dual Miner как опциональный компонент, но работает также и с опенсорсными майнерами, в том числе CUDA-оптимизированными. NHM не майнит в пользу разработчика (отсутствует dev fee) и не блокируется антивирусами — они могут ругаться только на отдельные майнеры при их автоматическом скачивании.
NHM распространяется с открытым исходным кодом. Порядок ее использования сводится к установке и нажатию кнопок «Бенчмарк» и «Старт», но рекомендую сначала сделать несколько твиков ради безопасности. Даже если ты будешь пользоваться другой программой, суть у них общая.
Безопасный майнинг
Во время майнинга видеокарты работают в нехарактерном для них режиме и быстро перегреваются. Сила тока, напряжение ядра, тепловыделение и многие другие параметры существенно превышают рекомендованные производителем значения. В отличие от игр, при майнинге нагрузка удерживается на максимальном уровне в режиме 24 ✕ 7. Причем она остается экстремально высокой не только для шейдерного домена видеокарты. МОП-транзисторы и другие элементы силовых цепей нагреваются в ходе бесконечного вычисления хешей свыше 120 °С, а штатная система охлаждения просто не справляется. Такой режим эксплуатации превращает видеокарту в короткоживущую деталь и дает мнимый прирост в скорости, поскольку в расчетах через некоторое время возникают ошибки. Они далеко не всегда появляются из-за перегрева. Это просто следствие длительной работы в критическом режиме.
Ошибка не всегда связана с перегревом
В примере ниже я увеличил допустимую температуру всего на один градус. Это привело к повышению потребления видеокарты на 15 Вт и резко снизило ее энергоэффективность, практически не сказавшись на скорости расчетов.
Падение энергоэффективности при повышении температуры
Майнить долго и стабильно поможет ограничение TDP или максимальной температуры чипа. Задать эти параметры можно фирменной утилитой управления видюхой (ASUS GPU Tweak, MSI Afterburner и подобные). Просто выбери значения из диапазона безопасных и комфортных по уровню шума системы охлаждения. Обычно это цифры до 80 °С. По спецификациям чипы выдерживают и больше, но в даташитах указаны именно кратковременные предельные значения для самого ГП. Если температурный лимит не установлен, появляется риск не просто ошибок из-за перегрева, а физического разрушения оборудования (пробоя диэлектрических слоев, отпаивания SMD-компонентов) и возгорания. Далеко не самые дешевые видеокарты в буквальном смысле горят у алчных майнеров синим пламенем.
Вариант 1. Присоединись к сообществу «Xakep.ru», чтобы читать все материалы на сайте
Членство в сообществе в течение указанного срока откроет тебе доступ ко ВСЕМ материалам «Хакера», увеличит личную накопительную скидку и позволит накапливать профессиональный рейтинг Xakep Score!
Подробнее
Вариант 2. Открой один материал
Заинтересовала статья, но нет возможности стать членом клуба «Xakep.ru»? Тогда этот вариант для тебя!
Обрати внимание: этот способ подходит только для статей, опубликованных более двух месяцев назад.
Я уже участник «Xakep.ru»
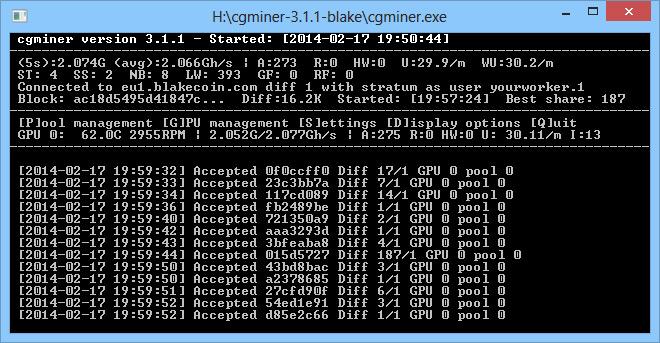
Runtime usage
The following options are available while running with a single keypress:
ool management PU management ettings isplay options uit
P gives you:
Current pool management strategy: Failover
ailover only disabled
dd pool emove pool isable pool nable pool
hange management strategy witch pool nformation
S gives you:
ueue: 1
cantime: 60
xpiry: 120
rite config file
gminer restart
D gives you:
ormal lear ilent mode (disable all output)
ebug:off
er-device:off
uiet:off
erbose:off
PC debug:off
orkTime details:off
copact: off
og interval:5
Q quits the application.
G gives you something like:
GPU 0: [124.2 / 191.3 Mh/s] [A:77 R:33 HW:0 U:1.73/m WU 1.73/m]
Temp: 67.0 C
Fan Speed: 35% (2500 RPM)
Engine Clock: 960 MHz
Memory Clock: 480 Mhz
Vddc: 1.200 V
Activity: 93%
Powertune: 0%
Last initialised:
Thread 0: 62.4 Mh/s Enabled ALIVE
Thread 1: 60.2 Mh/s Enabled ALIVE
nable isable estart GPU hange settings
Or press any other key to continue
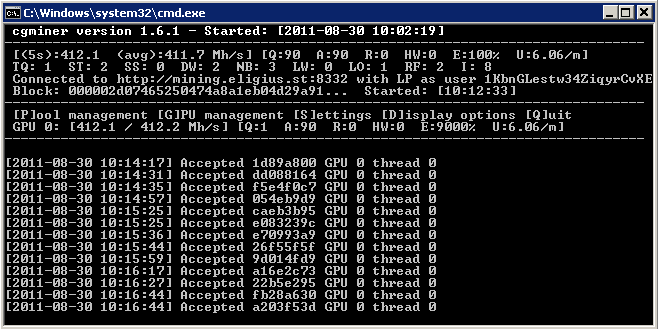
The running log shows output like this:
Accepted f0c05469 Diff 1/1 GPU 0 pool 1
Accepted 218ac982 Diff 7/1 GPU 1 pool 1
Accepted d8300795 Diff 1/1 GPU 3 pool 1
Accepted 122c1ff1 Diff 14/1 GPU 1 pool 1
The 8 byte hex value are the 2nd 8 bytes of the share being submitted to the
pool. The 2 diff values are the actual difficulty target that share reached
followed by the difficulty target the pool is currently asking for.
The output line shows the following:
(5s):1713.6 (avg):1707.8 Mh/s | A:729 R:8 HW:0 WU:22.53/m
Each column is as follows:
5s: A 5 second exponentially decaying average hash rate
avg: An all time average hash rate
A: The total difficulty of Accepted shares
R: The total difficulty of Rejected shares
HW: The number of HardWare errors
WU: The Work Utility defined as the number of diff1 shares work / minute
(accepted or rejected).
GPU 1: 73.5C 2551RPM | 427.3/443.0Mh/s | A:8 R:0 HW:0 WU:4.39/m
Each column is as follows:
Temperature (if supported)
Fanspeed (if supported)
A 5 second exponentially decaying average hash rate
An all time average hash rate
The total difficulty of accepted shares
The total difficulty of rejected shares
The number of hardware erorrs
The work utility defined as the number of diff1 shares work / minute
The sgminer status line shows:
ST: 1 SS: 0 NB: 1 LW: 8 GF: 1 RF: 1
ST is STaged work items (ready to use).
SS is Stale Shares discarded (detected and not submitted so don’t count as rejects)
NB is New Blocks detected on the network
LW is Locally generated Work items
GF is Getwork Fail Occasions (server slow to provide work)
RF is Remote Fail occasions (server slow to accept work)
The block display shows:
Block: 0074c5e482e34a506d2a051a… Started: Best share: 2.71K
This shows a short stretch of the current block, when the new block started,
and the all time best difficulty share you’ve found since starting sgminer
this time.
Basic Usage
WARNING: documentation below this point has not been updated since the
fork.
After saving configuration from the menu, you do not need to give sgminer
any arguments and it will load your configuration.
Any configuration file may also contain a single
to recursively include another configuration file.
Writing the configuration will save all settings from all files in the
output.
Single pool:
Multiple pools:
Single pool with a standard http proxy, regular desktop:
Single pool with a socks5 proxy, regular desktop:
Single pool with stratum protocol support:
sgminer -o stratum+tcp://pool:port -u username -p password
The list of proxy types are:
http: standard http 1.1 proxy
http0: http 1.0 proxy
socks4: socks4 proxy
socks5: socks5 proxy
socks4a: socks4a proxy
socks5h: socks5 proxy using a hostname
If you compile sgminer with a version of CURL before 7.19.4 then some of
the above will not be available. All are available since CURL version
7.19.4.
If you specify the —socks-proxy option to sgminer, it will only be
applied to all pools that don’t specify their own proxy setting like
above.
For more advanced usage , run .
See for more information regarding GPU mining and
for more information regarding Scrypt mining.
Documentation
Documentation is available in directory . It is organised by topics:
- for the RPC API specification;
-
for (largely incomplete) detailed information on all
configuration options; - for frequently asked questions;
-
for semi-obsolete information on GPU configuration options and mining
SHA256d-based coins; -
for OpenCL kernel-related information, including development
procedure; -
for how to find the right balance in GPU configuration to mine
Scrypt-based coins efficiently; - for information on how to build on Windows.
Note that most of the documentation is outdated or incomplete. If
you want to contribute, fork this repository, update as needed, and
submit a pull request.
Logging
sgminer will log to stderr if it detects stderr is being redirected to a
file. To enable logging simply append to your command line
and will contain all debug output unless you set
to , in which case it will only contain output at the log level you
specified (notice by default).
There is also the -m option on Linux which will spawn a command of your choice
and pipe the output directly to that command.
The WorkTime details ‘debug’ option adds details on the end of each line
displayed for Accepted or Rejected work done. An example would be:
The first 2 hex codes are the previous block hash, the rest are reported in
seconds unless stated otherwise:
The previous hash is followed by the getwork mode used M:X where X is one of
P:Pool, T:Test Pool, L:LP or B:Benchmark,
then D:d.ddd is the difficulty required to get a share from the work,
then G:hh:mm:ss:n.nnn, which is when the getwork or LP was sent to the pool and
the n.nnn is how long it took to reply,
followed by ‘O’ on it’s own if it is an original getwork, or ‘C:n.nnn’ if it was
a clone with n.nnn stating how long after the work was recieved that it was cloned,
(m.mmm) is how long from when the original work was received until work started,
W:n.nnn is how long the work took to process until it was ready to submit,
(m.mmm) is how long from ready to submit to actually doing the submit, this is
usually 0.000 unless there was a problem with submitting the work,
S:n.nnn is how long it took to submit the completed work and await the reply,
R:hh:mm:ss is the actual time the work submit reply was received
If you start sgminer with the —sharelog option, you can get detailed
information for each share found. The argument to the option may be «-» for
standard output (not advisable with the ncurses UI), any valid positive number
for that file descriptor, or a filename.
To log share data to a file named «share.log», you can use either:
./sgminer —sharelog 50 -o xxx -u yyy -p zzz 50>share.log
./sgminer —sharelog share.log -o xxx -u yyy -p zzz