How to Install Skype With Ubuntu
Содержание:
- Официальное приложение
- Install Sykpe Through Ubuntu Software GUI
- Install Skype through the Command Line
- Installing Skype Using Pacaur
- What Features Can I Use for Free?
- What Features Do I Have to Pay for That Are Useful or Interesting?
- How to Solve Common Problems
- Conclusion
- Настройка
- Selecting Microphone input device
- Установка Skype в Linux Mint 17
- Manual Installation
- Bonus
- Download and install the latest Skype client
- older Ubuntu versions
- Installing Legacy Skype Releases
- Running Skype
- Adjusting the camera in Skype
- Skype UI in other languages
- Reporting Skype Bugs
- External Links
- Linux-friendly Skype alternatives
Официальное приложение
Пока любители классического десктопного Скайпа страдают без возможности скачать инсталлятор, линуксоиды должны радоваться внезапному вниманию со стороны Microsoft. Сегодня на официальном сайте Skype в разделе «Linux» доступны сразу три варианта установочных файлов:
- SNAP-архив. Подходит для дистрибутивов вроде Ubuntu, где встроена поддержка инсталлятора SNAP. Вообще говоря, в теории он должен поддерживаться всеми Linux-дистрибутивами. Однако, к примеру, ссылка на SNAP-установщик Skype ведёт на сайт Snapcraft, который поддерживает компания Canonical — главный спонсор проекта Ubuntu.
- RPM. Предназначен для семейства дистрибутивов Red Hat. Однако популярность этого формата давно вышла за пределы «красной шапочки». Например, его давно поддерживают проприетарные операционные системы от IBM и Novell.
- DEB. Вариант для Debian-дистрибутивов Linux. Также совместим с той же Ubuntu и другими системами, в которых присутствует установочная утилита dkpg.
Все эти варианты установочных файлов доступны прямо с сайта Скайпа. Если сопоставить это с удалением Skype Classic для Windows, то складывается впечатление, будто сервис в целом переориентируется на Линукс
Это, конечно, не так, но внимание Microsoft к альтернативным операционным системам приятно удивляет
Возможные альтернативы
Что вам нужно от Скайпа? Если просто голосовые в пределах внутренней сети, то достаточно установить клиент любого сервиса вроде Telegram или Viber. Их дистрибутивы для данной ОС можно скачать на официальных сайтах. Это неплохая альтернатива Скайпу как сервису для Линукс.
Впрочем, у таких решений есть один недостаток: они не могут связываться с аккаунтами в сервисе, просто потому что они — не он.
Попытки создать альтернативу Скайпу, способную работать самостоятельно или как другой клиент Скайпа под Линукс, конечно же, были. Как правило, они основывались на протоколе Jabber. Однако из-за постоянных изменений в протоколах Skype транспорты, обеспечивающие межсетевую связь, оказались нежизнеспособны.

Некоторые разработчики публикуют свои альтернативные клиенты для Skype, в основном с целью снизить ресурсоёмкость сервиса и добавить дополнительные функции. Однако по факту выходит наоборот: часто такие приложения неспособны обеспечивать голосовую связь, не говоря уже о видео.
Можно признать, что Скайп окончательно стал проприетарным. В таком случае остаётся два варианта:
- Пользоваться каким-то из официальных Linux-приложений, благо выбор есть.
- Отказаться от Skype в принципе в пользу другого сервиса. Если критичны видеозвонки, то стоит рассмотреть Jabber с поддержкой расширения Jingle. Проблема с этим решением — слабая совместимость различных Jabber-клиентов между собой (в отличие от унифицированного Skype).
Окончательный выбор стоит сделать, исходя из ваших реальных потребностей. К тому же ничего не мешает попробовать оба варианта параллельно.
Install Sykpe Through Ubuntu Software GUI
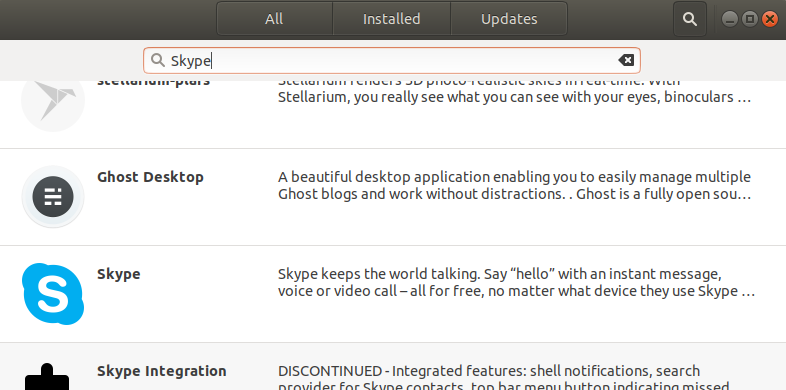
For a person who does not want to open the Command Line much, installing a software present in the Ubuntu repository through the UI is very simple. On your Ubuntu desktop Activities toolbar, click the Ubuntu Software icon.

Click the search icon and enter Skype in the search bar. The search results will list the Skype entry as follows:
Click the Skype entry from the search results. The following dialog will appear:
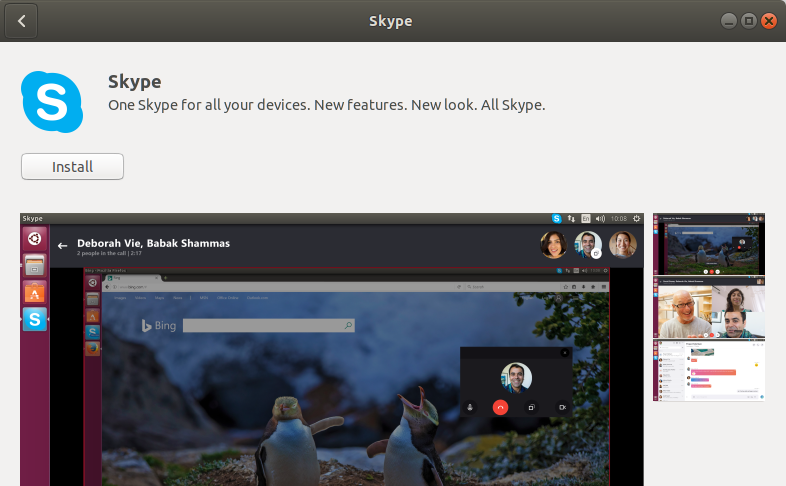
Click the Install button to begin the installation process. The following authentication dialog will display for you to provide the authentication details for a root user as only an authorized user can install a software on Ubuntu.
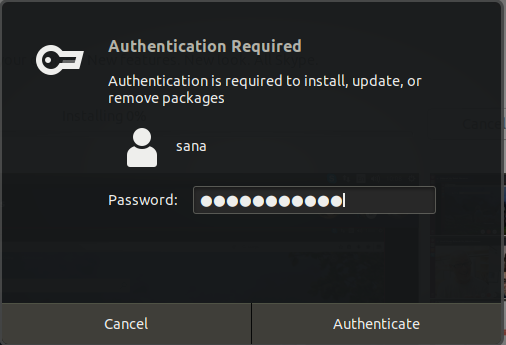
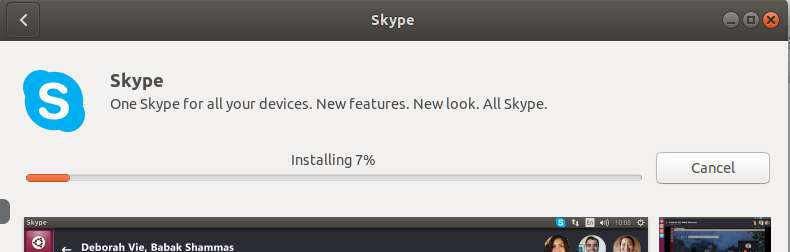
Enter your password and click the Authenticate button. After that, the installation process will begin, displaying a progress bar as follows.
Skype will then be installed to your system and you will get the following message after successful installation:
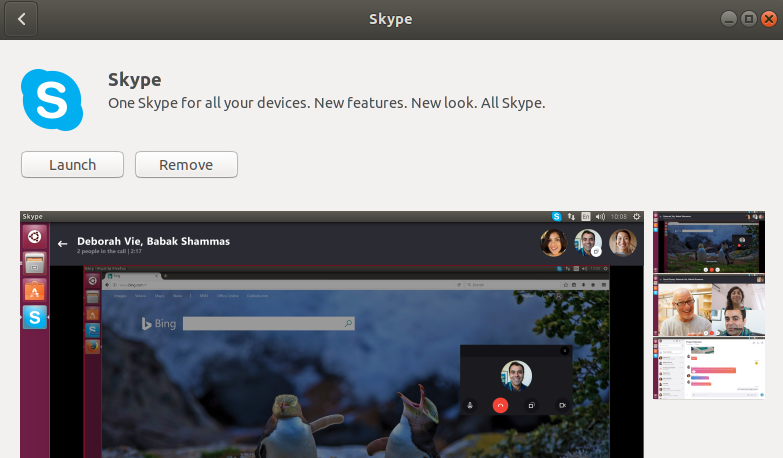
Through the above dialog, you can choose to directly launch Skype and even Remove is immediately for whatever reason.
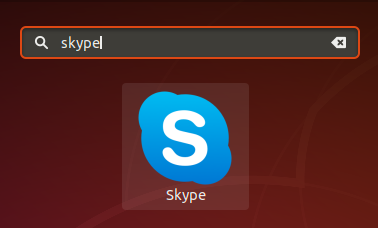
You can launch Skype any time you want by entering Skype in Ubuntu Dash or access it from the Applications list.
Install Skype through the Command Line
You can install Skype through the command line by following a few very simple commands. We are presenting two options for you to install Skype here:
- Install the Skype snap
- Install Skype from the official website
Install the Skype Snap
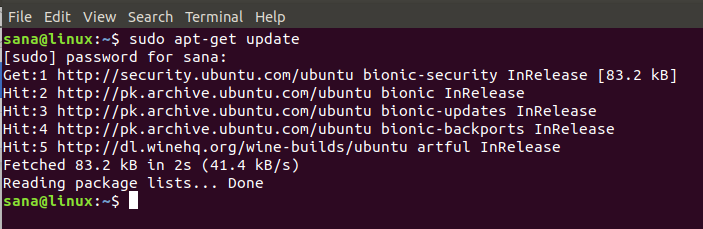
Open your Ubuntu command line, the Terminal, either through the Dash or by pressing the Ctrl+Alt+T shortcut. Enter the following command in order to refresh the list of available packages:
$ sudo apt-get update
Since the Snap daemon comes by default in the latest versions of Ubuntu, we do not need to install it. If you are using an older version, you can use the following command:
$ sudo apt-get install snapd
Now type in the following command in order to install Skype Classic version:
$ sudo snap install skype --classic

The Skype Snap will be successfully installed on your system and you can launch it through the Dash or through the Applications list.
Install from the Skype website
The official Skype website contains many standard Skype packages depending on your needs and system specifications.
Here we will describe downloading and installing a Skype package depending on the Ubuntu flavor you are using.
Step1: Check if you have an Ubuntu 32-bit or 64-bit system
There are different versions of Skype available for 32-bit and 64-bit flavors of Ubuntu. In order to check which version you are using so that you can install the appropriate version of Skype, please follow these steps:
1. Open the Terminal either through Ubuntu Dash or the Ctrl+Alt+T shortcut.
2. Use the following command to fetch CPU details from the files sysfs and /proc/cpuinfo:
$ lscpu
This command will display the following output:
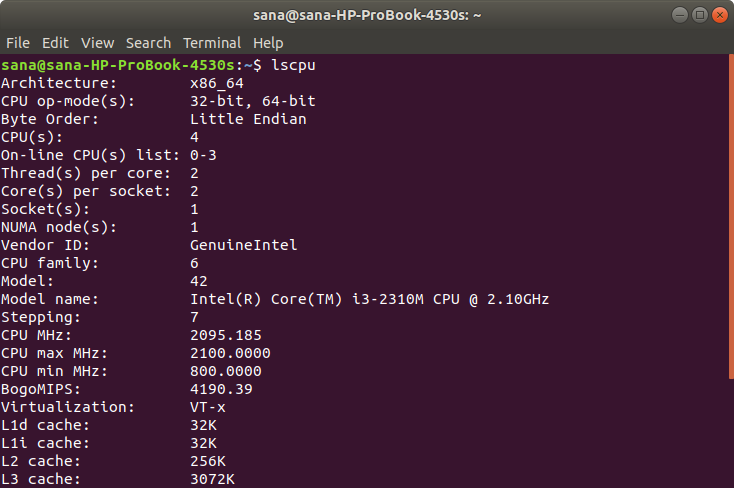
The CPU op-mode(s) entry tells you about the flavor of Ubuntu you are running on your system; 32-bit means you are running a 32-bit Linux OS, 32-bit, 64-bit signifies that you are running a 64-bit OS.
Step2: Enable MutliArch for a 64-bit system
Use the following command to enable multiarch in order to achieve better compatibility for programs on your 64-bit Ubuntu system.
$ sudo dpkg --add-architecture i386
Step3: Download Skype .deb package from the Skype website
Enter the following command in order to download the Skype package to your system:
$ wget https://repo.skype.com/latest/skypeforlinux-64.deb

Packages downloaded through the wget command are usually saved in your Home folder.
Step4: Install the downloaded package
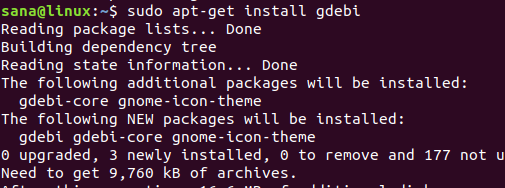
Let us first install the gdebi utility that will help us in installing the downloaded .deb package as follows:
$ sudo apt-get install gdebi
Enter the following command in order to download the Skype package through gdebi:
$ sudo gdebi skypeforlinux-64.deb
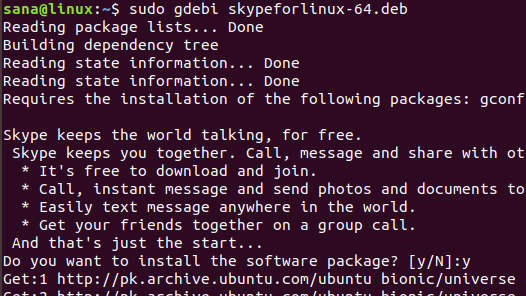
Please Enter y when prompted with a y/n option for installation after which Skype will be successfully installed on your system.

Now you can easily use this popular communication utility on your system. As you have seen, installing Skype is simple both through the command line and the Ubuntu Software utility. Luckily, this software is part of official Ubuntu Repository and also available on Snap and the official Skype website for you to install.
How to Install Skype on Ubuntu 18.04 LTS
Installing Skype Using Pacaur
Pacaur is a popular Arch User Repository (AUR) helper that wraps all operations of pacman, the default package manager of Arch Linux, and by extends its sync, search, info, download only, system upgrade, upgrades check, clean, and clean all functions to the AUR.
Before you can install Skype using pacaur, you need to install pacaur from AUR by completing the same steps as are described above. Once you have pacaur installed, you can use the following comamnd to install both Skype for Linux and Legacy Skype:
pacaur -S package_name
What Features Can I Use for Free?
The free version of Skype lets you call anyone else on Skype for free, participate in group calls with up to 25 people, forward Skype call to another Skype account, take your conversations to the next level with Skype video calls, send instant messages, share files, and even collaborate with a friend or colleague using the screen sharing feature.
To discover what else Skype can do for free, we recommend you visit its official website, where you can see a comprehensive list of features and click on any feature to read a detailed description of it.
What Features Do I Have to Pay for That Are Useful or Interesting?
Perhaps the most interesting paid feature is international calling to mobiles and landlines. Skype offers affordable domestic and international calling rates, allowing users to pay for calls to mobile and landline numbers with Skype Credit or a subscription.
Another useful paid feature is Skype call forwarding to a mobile or landline. To use it, you either need a calling subscription that covers the country you want to receive the forwarded calls in or purchase some Skype credit.
Last but not least, you may also be interested in the Skype for Business subscription, which “lets you add up to 250 people to online meetings, provides enterprise-grade security, allows you to manage employee accounts, and is integrated into your Office apps.”
How to Solve Common Problems
Linux versions of Skype aren’t exactly known for their reliability and polish. Things do break on occasion, and you should know how to find solutions to common problems.
For general Skype problems, we recommend the official Skype support page, where you can contact Skype’s official customer support team or join the conversation with other Skype users.
Solutions to many Linux-specific issues, such as the common problem with Skype’s GUI not matching the selected GTK theme, can be found on . Of course, you can also ask your fellow Arch users for help on the Arch forum.
Conclusion
Arch users who are already familiar with AUR shouldn’t have any problem installing Skype on Arch Linux, and those who have yet to discover what AUR is all about can approach the installation of Skype as a wonderful learning opportunity.
Настройка
Ладно, Скайп запустился… После запуска и подключения идём в главное меню и оттуда открываем окно «Настройки». В первую очередь следует проверить связь с устройствами.
Звук
Жмём «Проиграть тестовый звук». По сути, это проверка звонка и прочих звуков уведомлений. В моём случае вывод звука заработал на дефолтовом устройстве. Если не работает, то нужно выбрать какой-нибудь из выводов на аудиокарту, а дальше уж в ее микшере копаться. Если используется pulseaudio — тогда крутить регулятор громкости системных звуков.
- Теперь проверим микрофон. Делаем тестовый звонок — кнопка чуть ниже. Скайп коннектится к своему роботу. Если в настройках профиля заранее установить русский язык, то робот будет общаться по русски 🙂 Суть общения проста:
- сначала робот произносит фразу приветствия;
- потом, после звукового сигнала «слушает» и записывает голосовое сообщение;
- после следующего сигнала возвращает записанное сообщение;
- даёт пояснения и благодарит за использование сервиса.
Отмечу, что при дефолтовом устройстве возвращённого звука не было (возможно, из за того что ранее подключал микрофон к звуковухе), однако удалось добиться звука при выборе «USB Device 0x46d:0x8da (hw:U0x46d0x8da,0)».
Проблемы со звуком в skype и pulseaudio
При использовании pulseaudio не видно устройств ввода/вывода. Вместо них везде светится Pulseaudio server (local). Следовательно, микрофон и наушники/колонки искать придется именно там. Мой компьютер используется как медиацентр, потому звук от медиаплеера идет на колонки. Но я хочу для скайпа использовать гарнитуру, которая, как уже принято, без танцев с бубном не подключилась к Skype. Ковыряние с Kmix оказалось бесполезным.
- Запускаю микшер (регулятор громкости) Pulseaudio.
- На вкладке Конфигурация выбрал для своей гарнитуры вариант Цифровый (стерео, IEC958) + Аналоговый (моно) Input. Добавочка: странно, но на 64-битной версии цифра не пошла, поставил аналог.
- На вкладке Устройства ввода вижу что сигнал с микрофона гарнитуры приходит в микшер.
- На вкладке Устройства вывода вижу «цифру» своей гарнитуры.
- Тестовый звонок скорей всего будет без моего голоса. Вот тут последний и совершенно неочевидный штрих! На вкладке Запись именно во время тестового звонка нужно выбрать Аналоговый (моно) для скайпа — это и отправит сигнал с микрофона в нужном направлении.
Веб-камера
Logitech
У меня одно время использовалась веб-камера Logitech QuickCam Messenger (idVendor=046d, idProduct=08da). Она установилась как /dev/video0.
Ниже фрагмент /var/log/messages, снятый при подключени вебкамеры.
kernel: hub 5-0:1.0: unable to enumerate USB device on port 8
kernel: usb 4-2: new full speed USB device using uhci_hcd and address 3
kernel: usb 4-2: configuration #1 chosen from 1 choice
kernel: usb 4-2: New USB device found, idVendor=046d, idProduct=08da
kernel: usb 4-2: New USB device strings: Mfr=0, Product=0, SerialNumber=0
kernel: Linux video capture interface: v2.00
kernel: gspca: main v2.3.0 registered
kernel: gspca: probing 046d:08da
kernel: zc3xx: probe 2wr ov vga 0x0000
kernel: zc3xx: probe sensor -> 11
kernel: zc3xx: Find Sensor HV7131R(c)
kernel: gspca: probe ok
kernel: gspca: probing 046d:08da
kernel: gspca: probing 046d:08da
kernel: usbcore: registered new interface driver zc3xx
kernel: zc3xx: registered
kernel: usbcore: registered new interface driver snd-usb-audio
Microsoft
Приобрел Microsoft LifeCam VX-800 (ID 045e:0766). Подключал к разным компам с AltLinux 5 и 6 — видео заводится без танцев. Звук с вебкамеры не использую, хотя, работает без проблем.
Устройства не найдены
Драйверы вебкамер давно уже включены в состав ядра. Потому, скорее всего, устройство в системе есть. Но у пользователя нет к нему доступа. Смотрим, присутствует ли пользователь в группе video. Если нет — добавляем.
Устройство есть в списке
Выбираем устройство. Справа в чёрном прямоугольнике давим кнопку «Проверка» (в 4 версии скайпа кнопки нет, картинка сразу должна появиться) и… ожидаемой картинки нет. Раз от разу нечто зелёное вываливается…
Протестировал камеру при помощи fswebcam:
$ fswebcam -d /dev/video0 --jpeg 95 --save 1.jpeg
В файле получил нормальное изображение.
$ LD_PRELOAD=/usr/lib/libv4l/v4l2convert.so skype
# rpm -i libv4l-0.5.6-alt1.i586.rpm
Запускаем Skype из командной строки, как сказано выше, тестим камеру — порядок!
Последний штрих: правим команду в меню K, чтоб не вводить каждый раз прелоад.
Полезная утилитка v4l2ucp позволит настроить параметры картинки — яркость, контраст и т.п.
Selecting Microphone input device
Most netbooks/laptops have two input devices, one built into the casing and another one for plugging in an external microphone. In Ubuntu 10.04 (Lucid Lynx) and Skype 2.0+ you might have problems selecting the right input device. The following instructions should solve this issue:
1. Install pavucontrol, a program with which you can select audio devices
Synaptic
-
Go to Applications → Add/Remove…
-
Set Show: to All available applications
-
Search for pavucontrol and install it.
Or open the Terminal, and execute the following command:
sudo apt-get install pavucontrol
2. Start Skype and initiate a test call (you can use echo123 Skype testing service).
3. Start pavucontrol while the test call is running: Press Alt-F2 and type pavucontrol, hit return
4. In pavucontrol there is a tab called Recording where you can select the input device for the application Skype
Note: Skype has to be running and Skype needs to use (i.e. make a call) Pulseaudio while you change settings with pavucontrol.
Установка Skype в Linux Mint 17
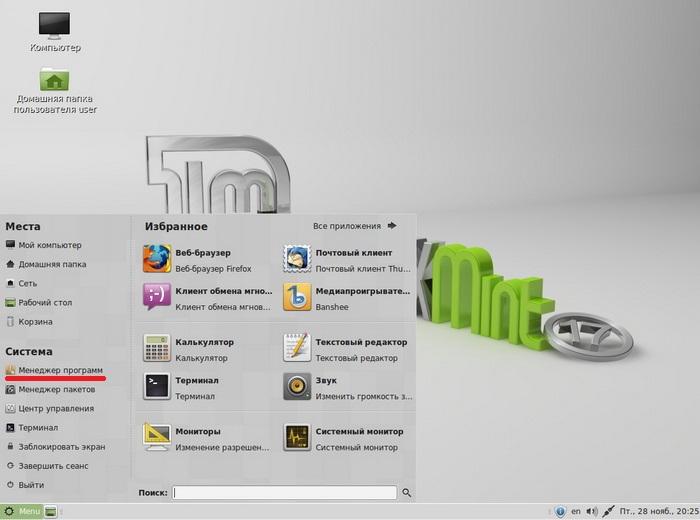
Так как данный материал для начинающих мы будем устанавливать программы с помощью «Менеджера программ» так как это действительно очень легко, и первое что нам необходимо сделать это, конечно же, запустить этот менеджер программ, а делается это следующим образом, открываем меню Mint и находим «Менеджер программ».
Примечание! Linux Mint 17 мы устанавливали в графической оболочке MATE, поэтому если у Вас другая среда рабочего стола то запуск «Менеджера программ» внешне может немного отличаться, хотя смысл одинаковый т.е. на первом шаге просто запустить «Менеджер программ».
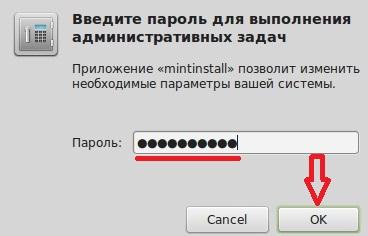
Затем для запуска mintinstall необходимо ввести пароль, это тот который Вы создавали при установке Linux Mint (если устанавливали не Вы, то необходимо узнать его у того человека кто устанавливал Вам систему). Вводим и жмем «ОК»
После чего запустится «Менеджер программ», по моему мнению, это один из самых удобных менеджеров, если сравнивать с другими дистрибутивами Linux.
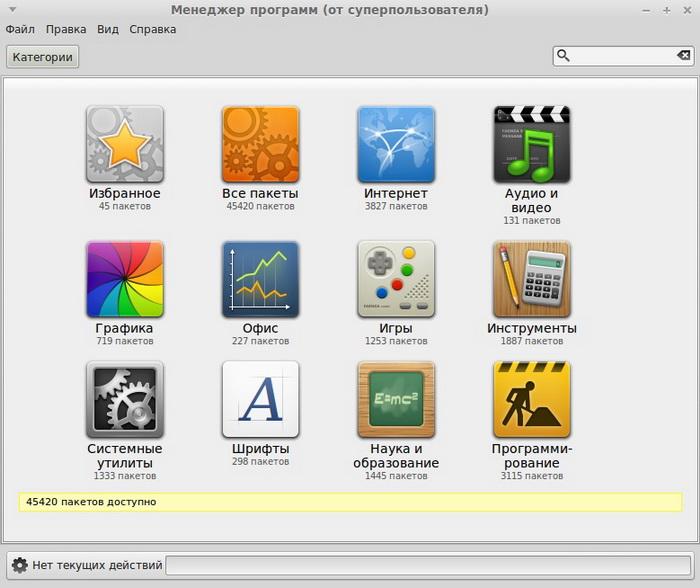
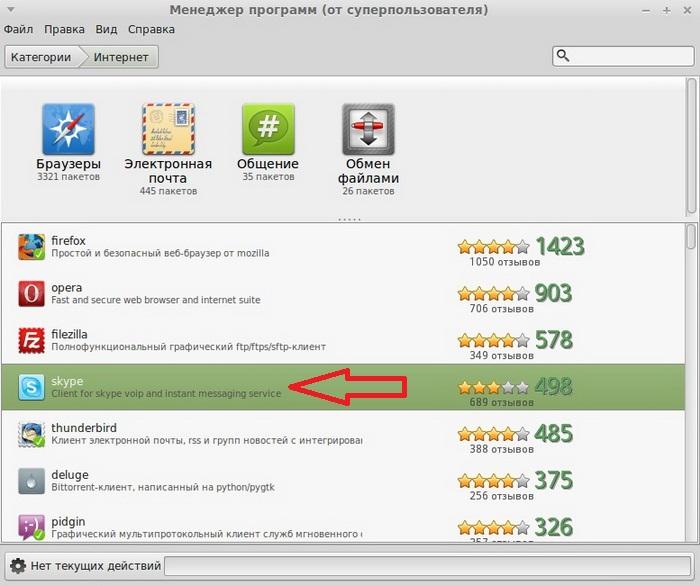
Теперь для установки программы необходимо выбрать группу, к которой относится нужная Вам программа, в нашем случае скайп относится к группе «Интернет», также можно найти интересующую Вас программу через поиск, например, написав название программы в окне поиска
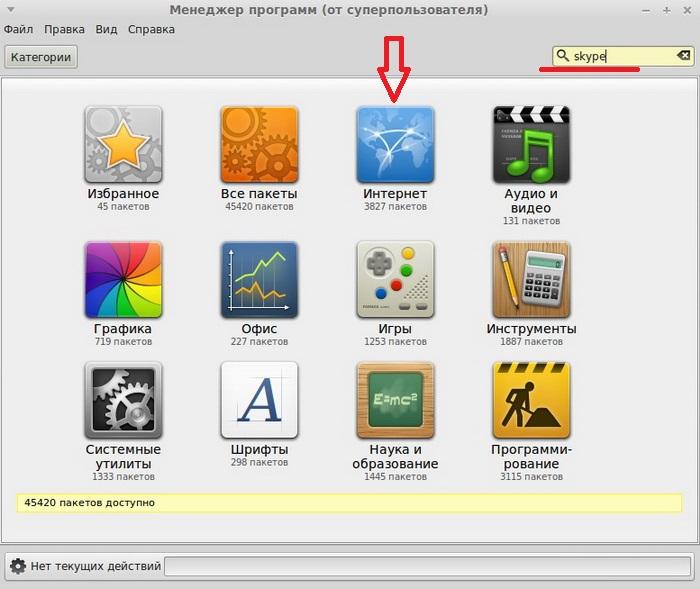
Затем щелкаем двойным кликом мышки по нужной программе, т.е. по Skype. Кстати напротив уже установленных программ будут стоять галочки.
Далее откроется окно с описанием выбранной программы и если опустится чуть ниже, то там будут отзывы и оценки этой программы, а мы жмем «Установить»
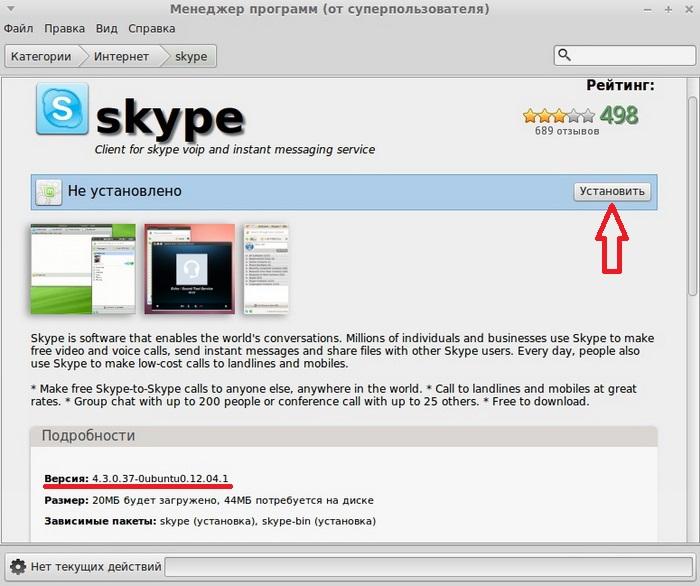
В нижней части окна мы можем наблюдать ход текущих действий

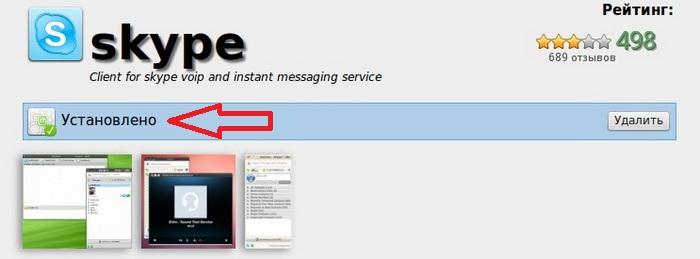
Больше от Вас никаких действий не требуется, ждем буквально минуту (в зависимости от скорости Интернета) и после появления сообщения о том, что программа установлена, можем закрывать менеджер программ
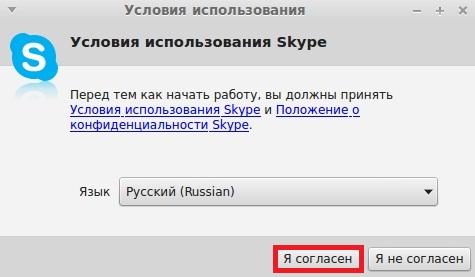
Теперь осталось запустить Skype, для этого открываем меню mint, выбираем Все приложения->Интернет->Skype

При первом запуске скайпа необходимо согласиться с условиями использования Skype, мы жмем «Я согласен»
Ну а потом выбираете с помощью, каких учетных данных Вы хотите авторизоваться, т.е. кокой логин и пароль есть у Вас, либо от skype либо от Microsoft, если нет, не того не другого, то нажимаете «Создать учетную запись» и в открывшемся окне браузера заполняете форму регистрации и соответственно регистрируетесь.
Вот мы с Вами и установили одну из последних версий скайпа для linux (x86) и на момент написания статьи это 4.3.0.37. Как видите установка программ в Linux Mint производится очень легко, путем нажатия одной кнопки. На этом все, удачи в освоении Linux Mint!
Manual Installation
To install Skype (both Skype for Linux and Legacy Skype) manually from AUR, you need to download the appropriate shell script containing the build information required by the package you want to install. This shell script is called PKGBUILD, and every package on AUR has one.
- Locate the package in AUR using the search feature.
- Download the build files, which contain the PKGBUILD, with your web browser by clicking the “Download snapshot” link under “Package Actions” on the right-hand side.
- Extract the build files with the following command:
tar -xvftar.gz
- Install the base-devel group, which is needed for compiling from source:
pacman -S base-devel
- Navigate to the directory with the extracted build files:
cd package_name
- Make the package:
makepkg -si
Read the makepkg and ABS wiki entries for more details.
Bonus
As a bonus, let me introduce Tox. This recently launched software does not include voice and video calls yet, but has the ambition to be the officious, completely secure, clone of Skype. With its design, entirely decentralized, and encrypted from end to end, Tox reminds me a lot of TorChat, but with a lot more ambitions. So this is software to support and keep an eye on.
To conclude, Skype is strong, Skype is big, but it isn’t the only one out there. If you want privacy, you can always find it. But just like the best intentions in the world, you will need your contacts and your friends to follow you in order for all of this to make sense. As Utopian as it sounds, I hope that one day we can all move on.
Support Xmodulo
Did you find this tutorial helpful? Then please be generous and support Xmodulo!
The following two tabs change content below.
Adrien Brochard
I am a Linux aficionado from France. After trying multiple distributions, I finally settled for Archlinux. But I am always trying to improve my system by stacking up tips and tricks.
Latest posts by Adrien Brochard
What are the best plugins to increase productivity on Emacs — December 24, 2015
What is a good IDE for R on Linux — October 11, 2015
How to automatically dim your screen on Linux — September 1, 2015
Download and install the latest Skype client
Lifewire
Linux
-
Guides & Tutorials
-
Basics
-
Installing & Upgrading
-
Tips & Tricks
-
Commands
-
Key Concepts
by
Gary Newell
An application developer and software tester with more than 20 years in the IT industry working on Windows, UNIX and Linux.
Updated August 17, 2019
If you visit the Skype website you will see the following statement: Skype keeps the world talking — for free.
Skype is a messenger service which allows you to chat via text, via video chat and by voice over internet protocol.
The text and video chat service are provided for free but the phone service does cost money although the cost of a call is much lower than a standard one.
For example, a call from the United Kingdom to the United States via Skype is just 1.8 pence per minute which depending on the fluctuating exchange rate is around 2.5 to 3 cents per minute.
The beauty of Skype is that it allows people to video chat for free. Grandparents can see their grandchildren every day and dads away on business can see their children.
Skype is often used by businesses as a way of conducting meetings with people not present in the office. Job interviews are often conducted via Skype.
Skype is now owned by Microsoft and you might think this would make it a problem for Linux users but actually there is a Skype version for Linux and indeed many other platforms including Android.
This guide shows you how to install Skype using Ubuntu.
Install Skype
Installing Skype on Ubuntu is much simpler than it used to be. Microsoft has released a mostly web-based Skype client and packaged it for most major Linux distributions. You only need to go to their website and select the package that you want to get it. From there, it’s only a matter of installing it on Ubuntu.
-
Open your web browser, and head over to Microsoft’s Skype download page.
-
Use the Get Skype… option to select Get Skype for Linux DEB.
-
When the window pops up asking you what you want to do with the file, select Open with and Software Install (default). Then, press Ok.
If you’re on Chrome of Chromium, it might just download without asking you anything. Select the package from the bottom of the window when it’s done downloading to open it.
-
The Ubuntu Software window will open up. Press Install to install the Skype package on your system.
Run Skype
To run Skype press the super key (Windows key) on the keyboard and start typing «Skype».
When the Skype icon appears to click on it.
A message will appear asking you to accept terms and conditions. Click «Accept».
Skype will now be running on your system.
A new icon will appear in the system tray which allows you to change your status.
You can also run Skype via the terminal by typing the following command:
skype
When Skype first starts you will be asked to accept the license agreement. Choose your language from the list and click «I Agree».
You will be asked to sign into your Microsoft account. Click on the «Microsoft Account» link and enter a username and password.
Summary
From within Skype you can search for contacts and have text or video conversations with any of them. If you have credit you can also contact landline numbers and chat to somebody you know regardless as to whether they have Skype installed themselves.
Installing Skype within Ubuntu is number 22 on the list of 33 things to do after installing Ubuntu.
Continue Reading
older Ubuntu versions
(Installing pavucontrol has not been necessary since Lucid Lynx — use the mixer via the toolbar speaker icon instead.)
If you are having audio problems, first check to make sure that sound is working on your system and that your microphone and speaker volume levels are high enough. First test your mic and sound by using the application Sound Recorder. If the mic works, and you cannot hear yourself using the Skype Test Call feature, do the following.
Skype has been known to mess up the mixer settings. So disable the automatic configuration of the mixer controls in Skype: right-click with your mouse on the Skype icon in the system tray — Options — Sound Devices — remove the tick at: Allow Skype to automatically adjust my mixer levels. Click Apply. Then close Skype (right-click with your mouse on the Skype icon — Quit).
Then use Synaptic Package Manager to install pavucontrol (Pulse Audio Volume Controller). Use that application to set up your input device. Most built-in mics are mono. The default setting on the Input Control is to lock the R&L channel together. By reading the mono mic as stereo, PulseAudio cancels the input. Click on the middle button on the upper right of the control panel to unlock the R&L channel. Move either the left or right channel to 10 leaving the other channel about 90. You should now see the VU meter sensing sound. Now start Skype again. The test call should register your voice now.
Does the above fail? Next try configuring pulseaudio according to the . If that does not work, then try changing the Skype audio device, and finally, if all else fails, modify your ESD configuration.
Installing Legacy Skype Releases
Users of 64-bit Ubuntu, should enable MultiArch if it isn’t already enabled by running the command
sudo dpkg --add-architecture i386
Since Ubuntu 10.04 (Lucid Lynx), Skype is part of the Canonical partner repository. To install Skype add the . You can do this by running the command
sudo add-apt-repository "deb http://archive.canonical.com/ $(lsb_release -sc) partner"
Then install Skype via the Software-Center or via the Terminal.
sudo apt-get update && sudo apt-get install skype
It is highly recommended to use the package provided in the Canonical partner repository, not the one distributed from the Skype website. This is how installing via a Ubuntu repository guarantees that the file downloaded and installed is the same one distributed from a Ubuntu repository. However, downloading the file via http doesn’t guarantee this outcome.
Running Skype
To start Skype, choose Applications->Internet->Skype. It usually takes a minute or two for Skype to get started, and you may think that nothing is happening, so be patient.
When the Skype window finally opens, sign up (if necessary) and log in to your Skype account. Test your configuration by selecting the Echo / Sound Test Service contact (if not there already, add contact echo123) and clicking on the large green button at the bottom of the Skype window. If the connection is made and you hear a voice, your sound configuration is fine. If you cannot hear a voice, see the troubleshooting section below.
Adjusting the camera in Skype
The Linux Skype client, while it seems to set reasonable defaults, does not offer any significant way to adjust brightness, contrast, backlight compensation etc. If you are using a uvcvideo based device (see lists at Linux UVC driver and tools) a handy way is to use the guvcview utility, which opens your webcam and allows you to fiddle with the common settings. These settings (mostly) remain when you close it and open a Skype video preview (in the Options | Video Devices menu) or make a video call. (Note that you cannot have Skype and guvcview reading the camera video stream at the same time.) Install the «guvcview» package in the normal way for this.
Or, if you want to tweak settings live during a preview or call, use the «uvcdynctrl» command-line utility (package has the same name). For example, in a terminal: uvcdynctrl -s 'Backlight Compensation' 7will increase the backlight compensation to 7 from its default value of 0. To see a complete list of the possible settings for your webcam, do uvcdynctrl -cv
You can also use «guvcview» in a control-only mode to adjust camera settings during the call. To do so launch guvcview with the -o switch: guvcview -o
Skype UI in other languages
You can choose to view the GUI in some other language but English, but only a limited number of translations are included in Skype for Linux by default. This Ask Ubuntu answer shows how you can install and use translations for other languages.
Reporting Skype Bugs
Despite Skype being offered in Ubuntu through the Partner repository as a service to Ubuntu users by Canonical and Skype (a division of Microsoft), it is not considered a part of Ubuntu. Because of this, filing Skype crash reports for processing on Launchpad by Apport Retracing service is unsupported. If one attempts to do this, they will receive a message noting:
|
Problem in skype-bin |
One may still file a bug report on Launchpad via https://bugs.launchpad.net/ubuntu/+source/skype/+filebug.
External Links
-
A description of and workaround for the sound problem: http://juljas.net/linux/skype/. Note that this solution requires you to compile a C program.
-
Skype takes a long time to load? (change command to «skype —disable-dbus») http://forum.skype.com/viewtopic.php?t=47838
-
SkypeRecordingHowto Recording Skype Conversations
Linux-friendly Skype alternatives
In my experience, Ekiga works quite well. In particular I was also pleasantly surprised at how well it worked with NetMeeting. If it weren’t for the overall value in the Google Chat/Talk/Voice package, Ekiga would be my favorite Linux VoIP program. That said, if free software is a priority for you, then Ekiga is the program for you.
. Sorry if I’m confusing you bu using three different names, but Google has made describing its VoIP service more than a little confusing. I’m reminded of the story of the blind men and the elephant. Depending on what part of the elephant you’re touching, you’ll have an entirely different perception of the whole beast.
Here’s the truth of the matter: If you have Google Chat, which is Google’s IM service, and Google Talk, which is its VoIP and video service, and Google Voice, which is Google’s private branch exchange (PBX) service, you end up with the full range of VoIP and video services, including the ability to call landline and mobile numbers.
That is, if you’re in the U.S. All too many of the Google combination’s features don’t work outside the U.S. You can still call out of the States, for example to someone using an XMPP service in the U.K., but they can’t use the Google package to return your call. Hopefully, Google will launch its full range of services worldwide, or at least in the rest of North America and Western Europe, sometime soon.
For me, it’s too much trouble for not enough benefit. But, they are actively working on improving it, and unlike Google’s offerings it’s not a U.S.-only package, so I plan on keeping an eye on it.
In my experience, Linphone works OK, but it doesn’t knock my socks off. Jitsi has more promise and Google has more real-world functionality.
Besides these there are many other Linux VoIP programs. These are just the most well-known ones that I’ve used.
If I were looking for a Skype replacement today, I’d have to go with the Google package, but then I live in the U.S. and I would really like it if there was a single, easy-to-use and international Google Talk/Voice combination. Over the years, I’ve liked Ekiga, but of the standalone clients I think Jitsi has the most potential to be a great VoIP client.
As always with open source software, you don’t need to take my word for it. All these programs are free to download and use. The SIP and XMPP networks are also free to use. So, try them out for yourself and see which works best for you and your buddies. One way or the other, you’ll find one that’s better than Skype.